Learn how to bypass Daz Studio completely by leveraging Poser’s FBX export feature to import your Poser assets directly into Blender.
In the last tutorial I published a few months ago* I demonstrated how to use Daz Studio to bring Poser assets into Blender. There may be situations where that’s not ideal or you simply don’t want the rigamarole of dealing with three different programs*, so I started experimenting and this is what I came up with…
- There is always the possibility that the Daz to Blender plugin might break in an update for older Daz figures, and it also doesn’t fully support Poser-specific figures like La Femme.
- This tutorial was supposed to follow a week or so later but life happened.
- If the Daz to Blender bridge should break for older figures, you should still be able to export the figure as an FBX file.
- Another reason for pursuing this workflow—if Poser could be eliminated entirely, and the CR2 files imported directly to Blender, this could potentially make transitioning to Linux for those of us who don’t want to deal with Windows 11 easier.
- Daz is currently owned by a company that seems intent on squeezing whatever profits it can out of its users, and with the launch of Daz Premier last fall, there’s the possibility that export functionality like the Daz to Blender Bridge could end up behind a paywall.
This tutorial series makes the assumption that you’re comfortable with both Blender and Poser.
Table of Contents
Abbreviated Backstory
Roughly two years ago I started bringing over the assets for Silent Shadow into Blender, the only way I knew how to do it effectively was through Daz Studio (see How to Move Poser Assets to Blender, Via Daz Studio). However, once I started peeking under the hood of what the Daz to Blender plugin does, I realized that I could just as easily do this directly from Poser. The main advantage of the Daz to Blender plugin, is that it makes it easier to bring over morphs as shape keys. You can still bring over morph data from Poser, but the result isn’t as nice or user-friendly as Daz’s version.
Daz2Blender versus Poser’s FBX Exporter
There are some advantages that Daz’s Blender Bridge has over Poser’s FBX exporter.
What is the Daz to Blender Bridge?
The abbreviated description: the Daz to Blender Bridge is a fancy FBX Exporter for Daz Studio[1], and a just-as-fancy FBX Importer add-on for Blender. Behind the scenes, the Daz to Blender Bridge add-on actually leverages Blender’s FBX importer.
The Daz To Blender Bridge makes it easy for you to export your figure to Blender with armature and morph-data intact. The Bridge makes it relatively straightforward to export the morph-data and any additional information that might be helpful. On the Blender-side, the Bridge adds basic bone widgets to the figure’s armature, limit rotation and ik constraints, a side-panel for easily accessing the figure’s morph data, and drivers to the figure’s JCM morphs that update according to changes in the armature.
Exporting Morphs from Daz Studio or Poser
Daz offers a user-friendly way of exporting morphs to Blender as shapekeys, and it provides a nice interface in Blender for working with the ported morphs. You can export morphs from Poser as well, but the interface is a bit clunky to work with, plus once in Blender, you won’t have full-body morphs, but a morph for each vertex group—what would be the full-body morph in Poser will appear as MyMorphName.00# in the Shapekeys panel. I had something similar from Daz before I really knew what I was doing, but Daz Studio added a suffix that made identifying which vertex group the morph belonged to, listed as MyMorphName_bodyPart.
Working with Weight Maps From Daz Studio or Poser
The weight-maps you get from Daz Studio are easier to work with and don’t require as much adjustment as weight-maps from Poser[2]. Current versions of Poser (going back to Poser 9) supports weight-mapping, but some older figures don’t. Daz Studio makes it easy to convert figures from fall-off zones (Poser’s—and Daz’s—old method of determining where to bend geometry) to weight-maps. Poser can also convert figures to weight-maps, but requires some additional work[3]. I’ve never tried this method but I also feel that Blender’s weight-mapping tools are easier to deal with than Poser’s. If you don’t convert the fall-off zones to weight-maps, importing into Blender will give you an approximation of weight-maps—or rather, the weight-maps you get closely follow the borders of the vertex groups in the OBJ file.
Working with the Armature from Daz Studio or Poser
Another advantage the Daz to Blender Bridge has over Poser is the imported armature. From Daz, you get bone widgets and—most times—correctly aligned bones. Poser gives you the bare-bones armature, and you may need to adjust the positioning of some bones—this is actually an issue with the Blender FBX Importer, which I’ll get to later on.
Comparing the Daz2Blender Bridge to Blender’s FBX Importer
Compared to the Daz to Blender FBX importer, Blender’s FBX Importer is bare-bones. It gives you the geometry, a basic deformation-layer armature, and morphs in the form of shape keys—if they’re present. However, unlike the Daz to Blender add-on, the FBX importer doesn’t do anything special. You get the bare armature with no bone widgets. While you do get the morph data, it won’t be the same as working in Poser.
3rd Party FBX Importers
There are 3rd party options available but it’s definitely a “your-mileage-may-very” situation. The one add-on I tested was the Better Fbx Importer & Exporter add-on from Mesh Online and it took a few tries before I got the import right. By comparison, the Blender FBX importer is simpler to work with.
New FBX Importer Coming in Blender 5.0
During the course of writing this tutorial, I learned that Blender 4.5 introduced a re-written FBX Importer using C++ instead of the original Python library, which is supposed to be faster than the Python library.
On the one hand, I’m excited for the update but on the other, this update will break the Daz to Blender Bridge plugin as well as the add-on that I’m currently working on. Both my add-on and the D2B Bridge use the bpy.ops.import_scene.fbx operator, which is going to be replaced by bpy.ops.wm.fbx_import. My add-on also does some automatic selection (or deselection) of options that may be removed with the new version—those options are needed to properly import the FBX file from Poser. Unless these options are added back in 5.0, I may need to fork the old *Python-based exporter for my tool to work properly.
Or maybe that’ll be the kick in the ass I need to cross learning C++ off my twenty-plus-year-old list of things to do.
Advantages of using Poser’s FBX Exporter
There’s no need to compile a new full-body morph to make exporting to Daz Studio easier—instead, you have the option to bake all morphs, or export the morphs you need.
Exporting from Poser
The example figure I’m using is Daz3d’s Aiko3—but this tutorial should work for any Poser figure.

First test subject was my main character from my web-comic, Silent Shadow—with clothes and hair.
There’s no need to select the figure before export. To get started, go to File > Export > FBX...
This should show you a new dialog that allows you to select which part of the scene you wish to export. In this example, I have everything except cameras and ground selected.
Once you click OK, you should get another dialog (see below). Don’t adjust anything but make sure that Include Rigging and Bake all morphs are checked. Also make sure that the FBX File Type is set to Binary. The FBX Format Version doesn’t matter as long as it’s 2011 or newer.


Once things are set to your liking, click OK and save the file—just make sure to remember where you saved it!
Exporting Morph Data
If you wish to export the morph data as well, uncheck Bake all morphs. When you uncheck this option, you will get an additional dialog that allows you to select the morphs to bring over. When you scan the list, you may find that the morphs you need to bring over are already selected. You can choose to bring in additional morphs as well, but the export could take a little longer to build the file.
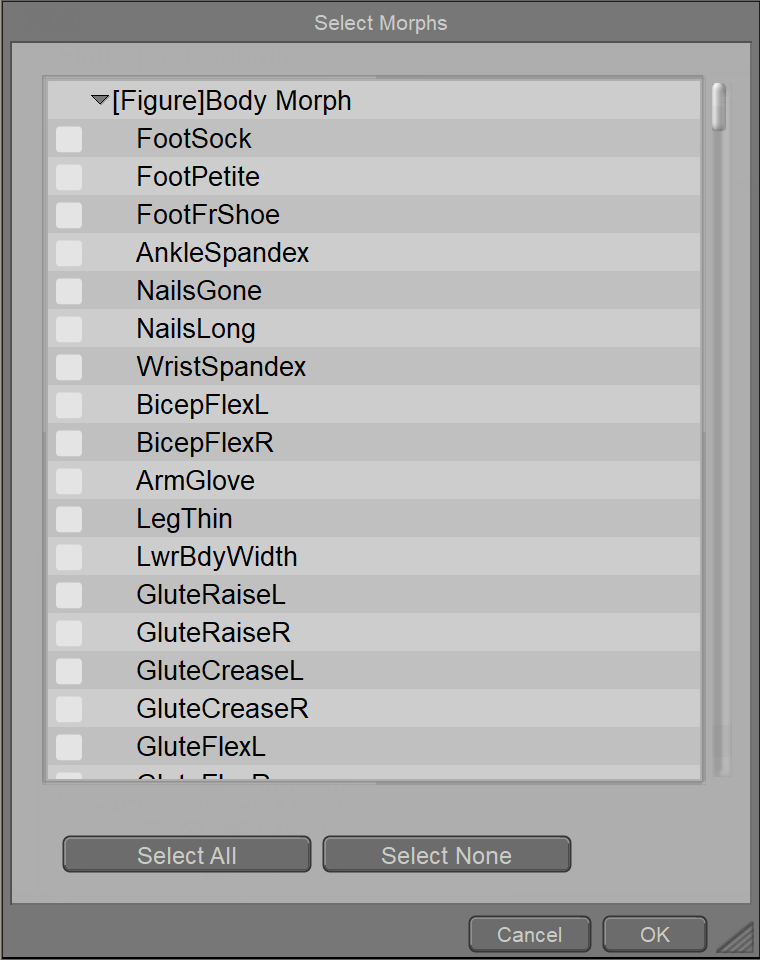
This can get sort of cumbersome if you have more than one or two figures selected, though.
Additional Settings
I like to uncheck the Include Normals option because they will be imported into Blender as custom normals. These normals are how Poser interprets geometry and may cause shading issues with your figure. Also, clear the Export every frame as key-frame option. You don’t need the additional key-frames—unless you want to bring over animation data as well. I also leave the Invert transparency map option checked because the way Blender handles transparency maps is actually inverted from what you’ll be used to in Poser[4][5].
Importing into Blender
If you haven’t already, start Blender. Once Blender is loaded, go to File > Import > FBX (.fbx). If for some reason, you don’t see the option, go to Edit > Preferences, then click on the add-ons tab and search for “fbx.” You should see an add-on called FBX format. Enable the add-on, then click Save Preferences and close the window.

Once the import dialog is open, leave all settings alone, except for the Animation checkbox and the options under Armature. If Animation is checked (it likely is), clear it. Then, under Armature, check Force Connect Children and Automatic Bone Orientation but leave Ignore Leaf Bones unchecked. The second two options avoid the issue of having the bones pointing in weird directions, while leaving the last option unchecked ensures that the third bone in the finger chains is properly imported.
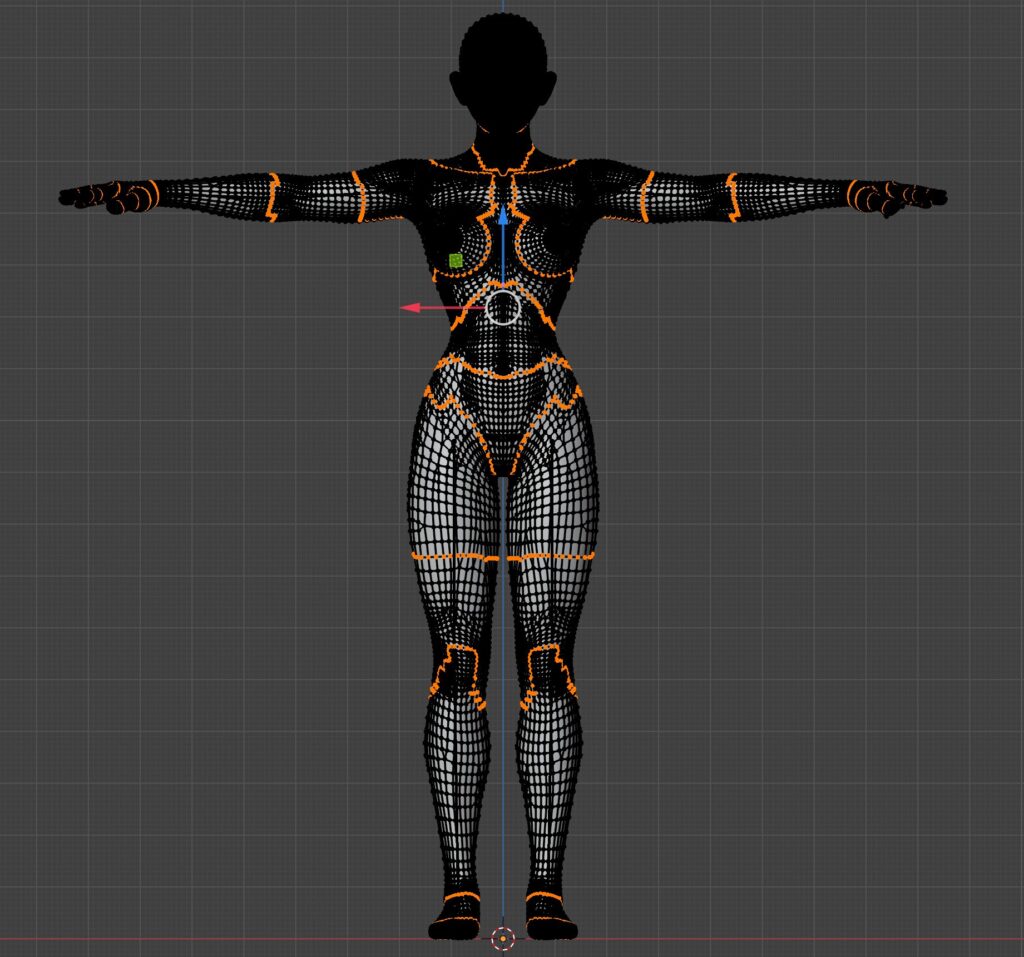
Navigate to the location of the FBX file you exported from Poser. Select this file. If all went well, you should have something like the example below.
 exported from Poser as imported into Blender.")
Scaling Differences Between Poser and Blender
If you’ve worked with Poser, then you’re already familiar with the difference in how the Y and Z axis are handled.
In Poser, Y is up/down and Z is forward/back, while in Blender, Z is up/down and Y is forward/back.
Poser also scales objects differently from other 3d programs. A figure in Poser is 1/100th the size it would be in Blender or 3DS Max.
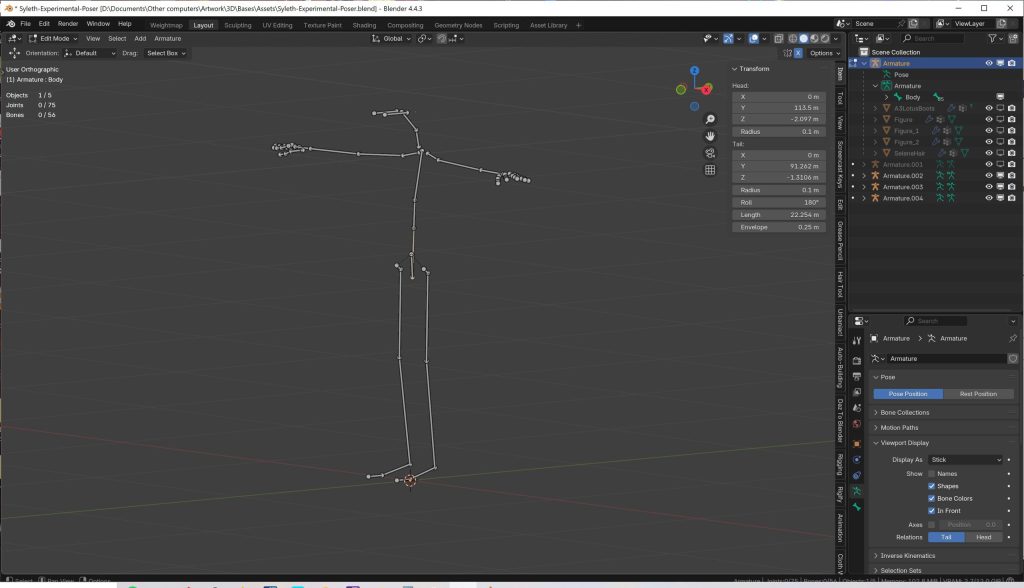
In order to correct this, make sure that you’re in Object Mode. Next, check the Armature’s Scale and Rotation values in the Transform tab (press N to reveal). You’ll notice that the Scale value is 0.01 and the Rotation value is 90°.
To fix this, start by selecting the armature. Press Ctrl+A and select Rotation & Scale. Then select all child figures and perform the same action.
Even though I was aware of this difference between Poser and Blender, it still tripped me up when I started making changes to the armature.
💡
Make sure all transforms are applied before doing any work on the figure. This will prevent a lot of headaches later on, like symmetry- and weight-painting issues.
You might encounter situations where applying transformations to an imported object causes it to break—this is more likely to happen with props that are parented to a body-part, like hair, for example. This may be because Poser scales the prop relative to the body-part’s size instead of the scene’s size. If you encounter this, the way I’ve dealt with it is unparenting the object (ALT+P) and selecting the “Keep Transformations” option. Now, you can use CTRL+A to reset the object’s transformations accordingly. Afterwards, you can reparent the object to the Armature if you wish.
Working with Poser’s Morph System in Blender
When the FBX file is brought into Blender, you will find that the corresponding shape keys that would be full-body morphs in Poser don’t work. If you search through the shape key list further, you will find shape keys with the same names as the fbms but will have a number suffix attached to it. These are the working shape keys but they affect different parts of the body, similar to the “p” Morphs in Poser{{p{MorphName} is actually a Daz naming convention that’s been copied by other figure creators.)).
This is where the Daz to Blender Bridge ends up being better than Poser’s FBX Exporter. On the Daz-side, the bridge actually compiles the shapekeys into usable full-body morphs. I’m in the process of writing an add-on that fixes the shape-keys coming from Poser. It might work on other FBX imports, so once its released, any feedback would be greatly appreciated.
Recommended View Settings
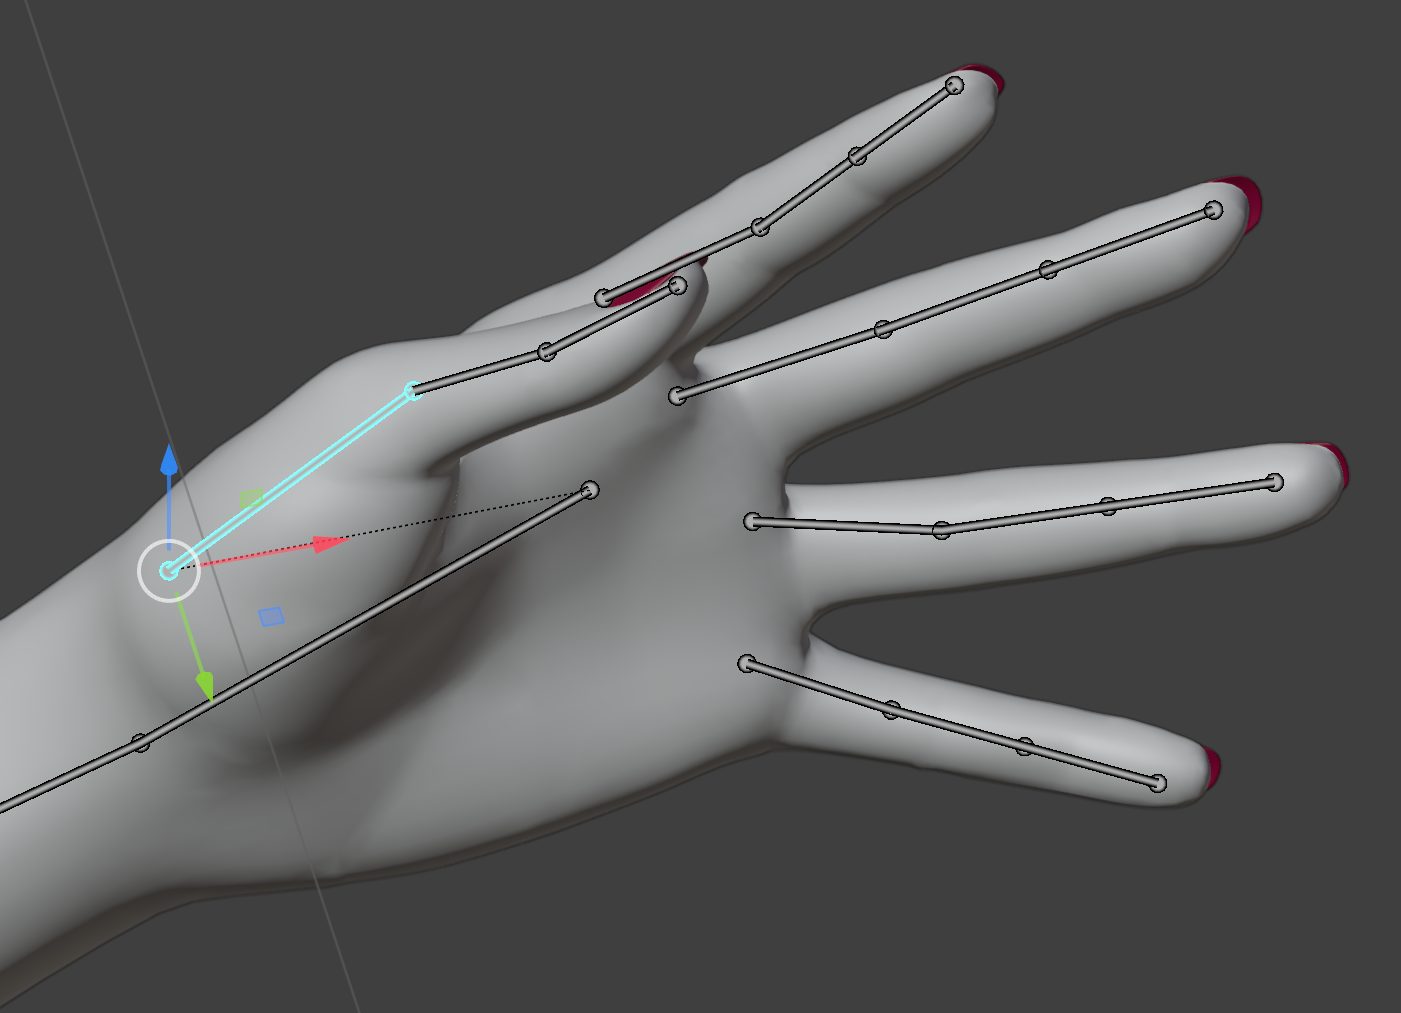
In order to see the bones properly, click on the armature then click on the Armature tab in the Properties box to the right. Go to the Viewport Display tab and select In Front, then if you like, change Display As to something that’s easier to see than the default Octahedral display. Selecting In Front, will allow you to see the bones over the figure[6].
Extra Bones
Poser’s rigging system works on the concept of “conforming” clothing and other objects to the main figure. In order to do that, the object in question needs to have a rig that matches the naming convention and bone-position of the parent figure. In short, each additional object (clothing, hair, etc) that Poser calls a “Figure” will have its own rig. These separate rigs are combined into the main armature when exporting from Poser.

If you look at the Outliner on the right, and click on the Armature object, you’ll notice that there’s a number of root bones, the number should match the number of figures you exported from Poser. Unfortunately, they’re named “Body”, “Body.001”, “Body.002”, etc—not exactly helpful. You’ll also likely notice that each figure has a bunch of extra bones that aren’t needed for posing in Blender.

Having separate armatures for clothes and hair may make sense in some circumstances—for example, a character wearing a hoodie with a posable hood. I may come back to pros and cons of separate armatures for the same figure in another post.
For now, we’re going to leave the bones associated with the clothing and hair alone. Luckily, you can toggle visibility on these parts by pressing the shift-key and clicking the Disable in Viewports icon next to the bone in question. Pressing the shift-key while clicking ensures that all of the bones in the tree are hidden, not just the root. If this icon isn’t visible, click the Filter icon in the top-right corner of the Outliner and enable the Disable in Viewports toggle. Now that these bones are hidden, you should be able to see the main figure’s bones.
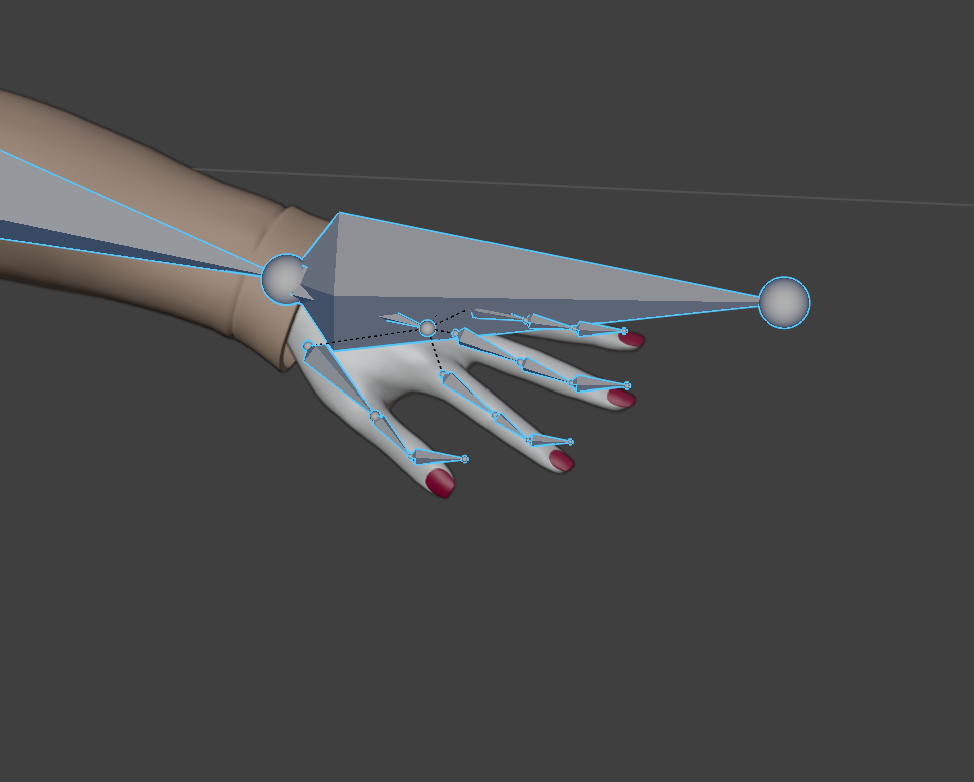
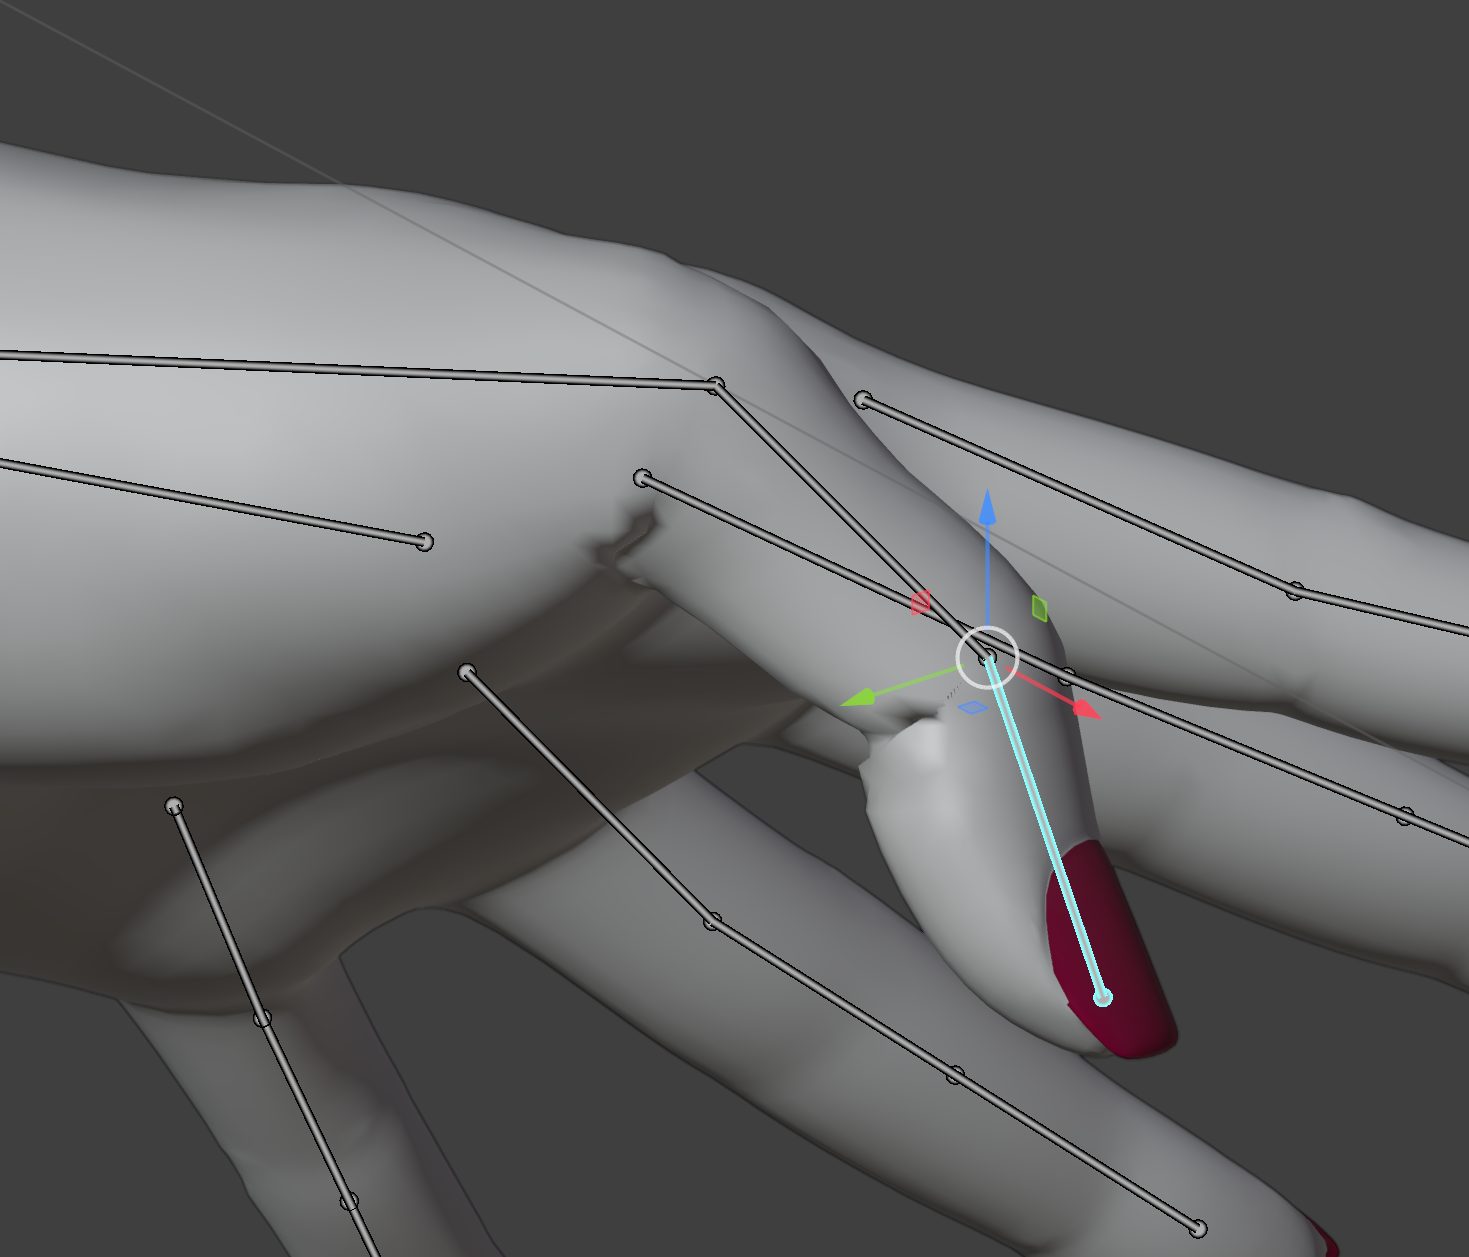
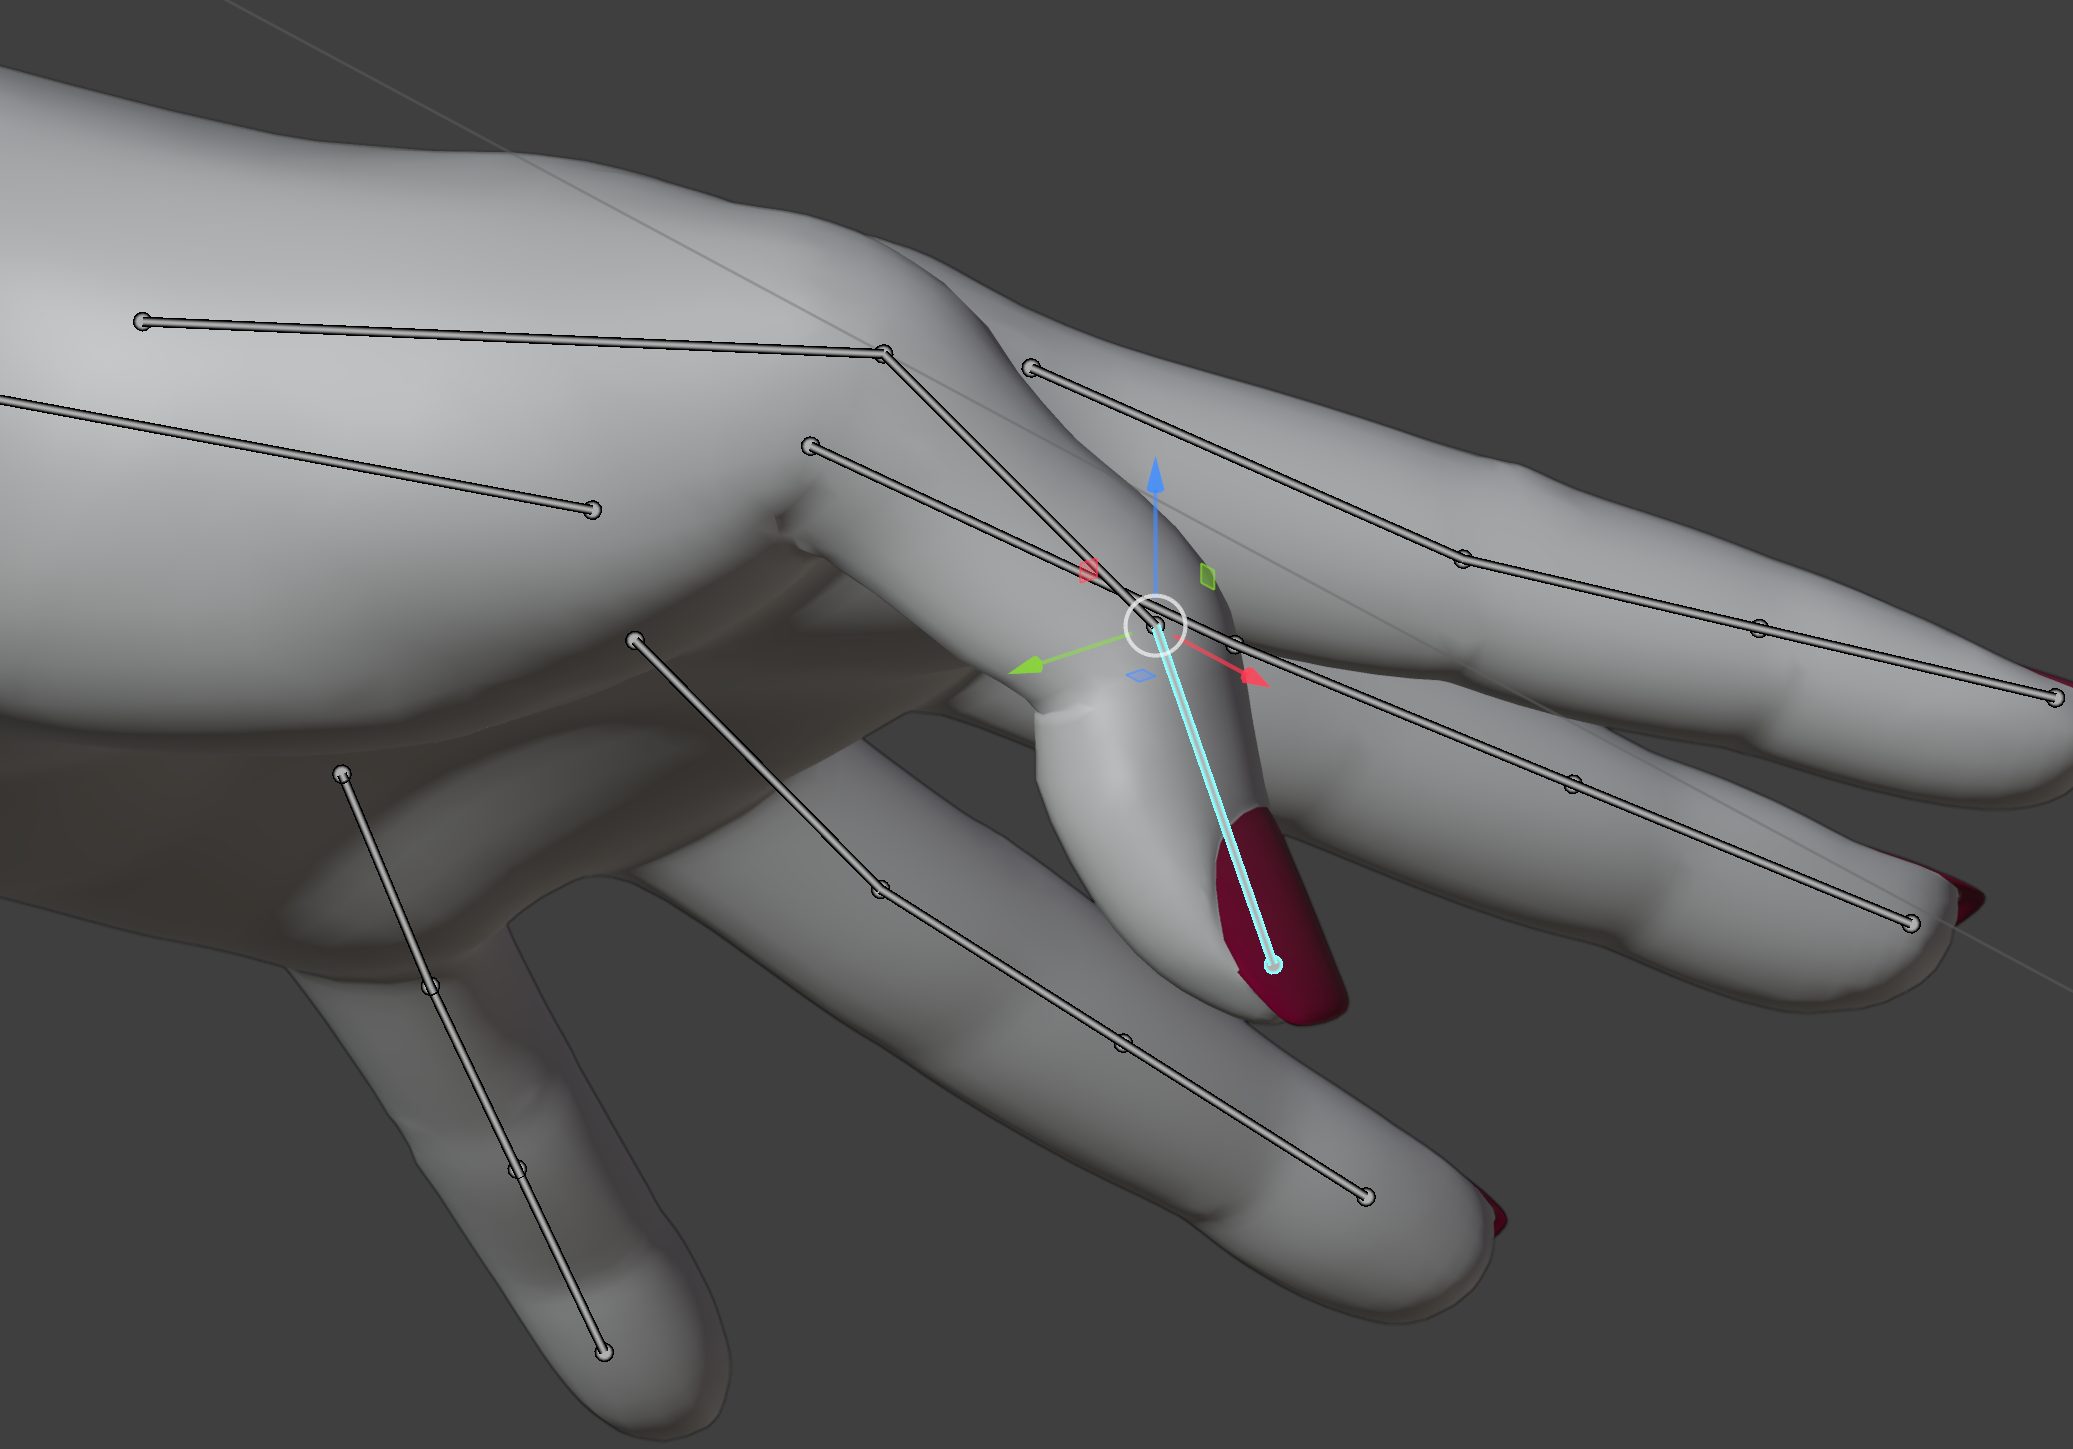
In this example with Aiko3, one area that had issues was the last bone in each finger chain. Luckily, there’s an easy way to fix that. With the Armature selected, hit the Tab key. This should bring you directly into Edit Mode. If you end up in Pose Mode instead, press Ctrl+Tab to bring up the pie menu and select Edit Mode.
Once in Edit Mode, click on the last bone (the misaligned one), then click the next bone behind it in the chain. Press Alt+Ctrl+A to realign the bone with the rest of the chain.
In the case of the last bone in the thumb joint, I had to do some manual adjustments as well Alt+Ctrl+A.
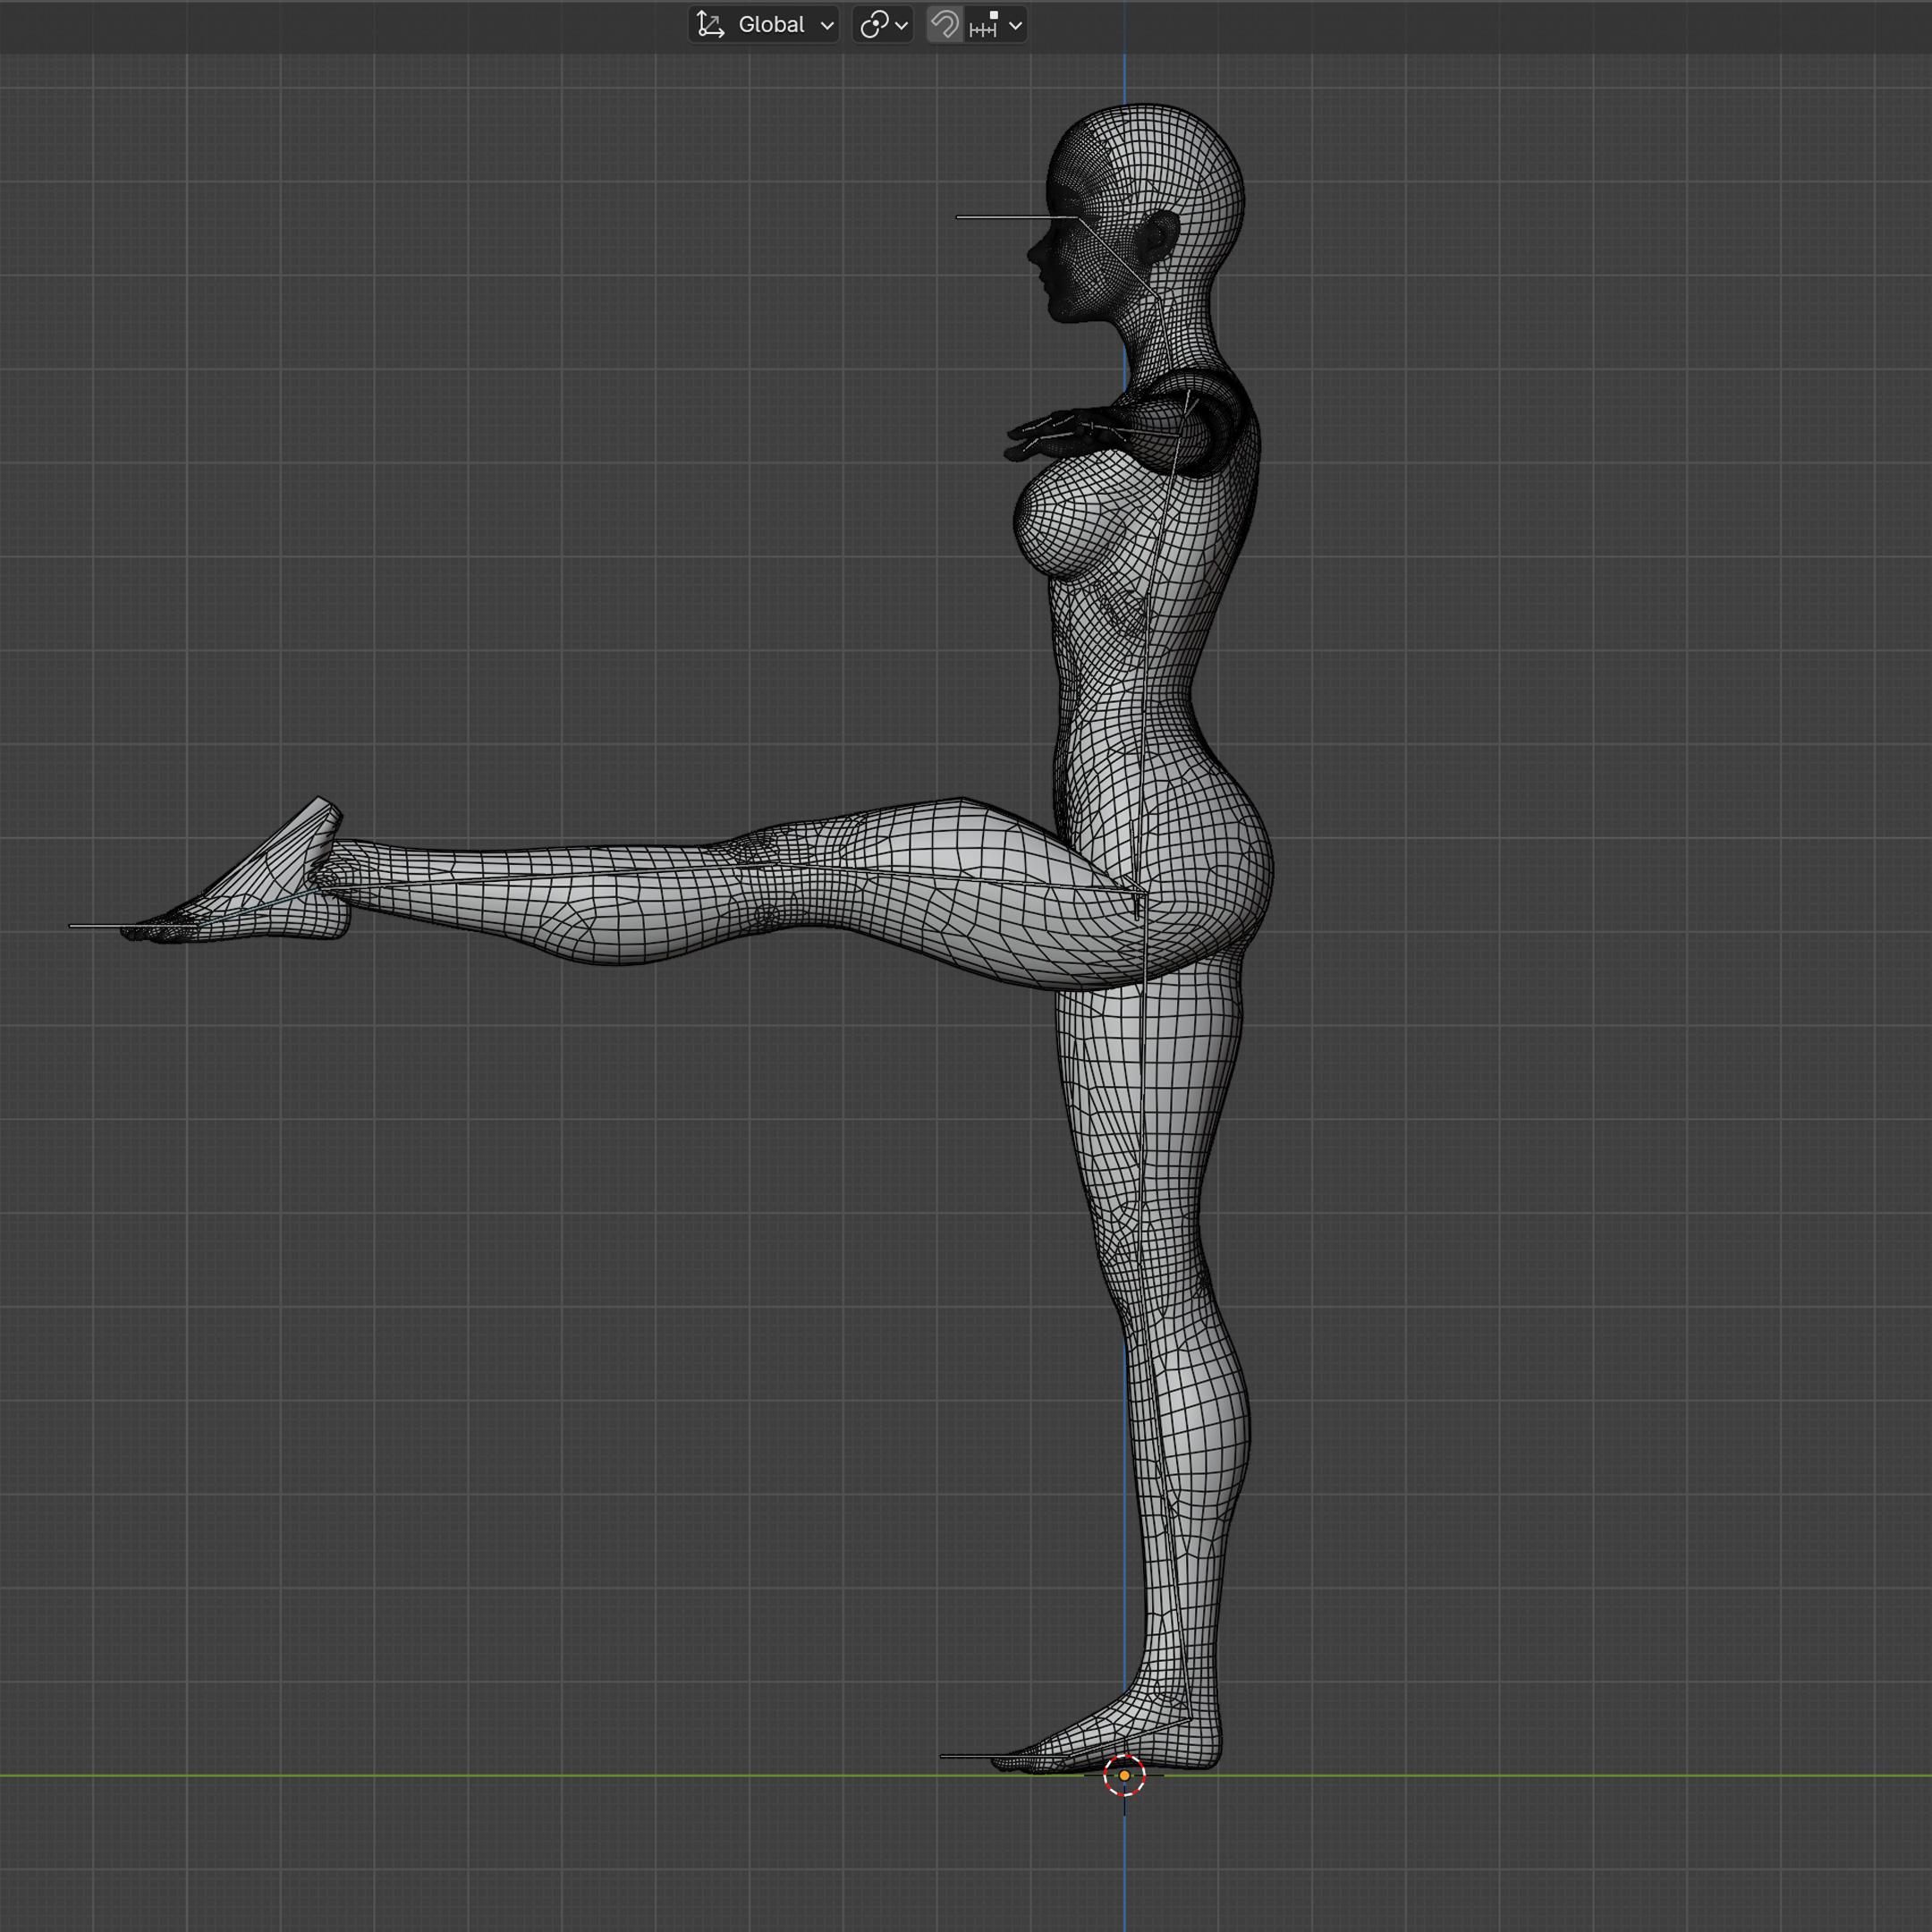
Finding the Problem Areas
Switch back to Pose Mode and hide the clothing and accessories. Play around with posing the character. Here, you’ll be looking for any issues in bending and deformations.
Loose Geometry
One difference between Poser and Daz Studio’s FBX import is the number of vertices. Using Aiko3 as an example, the Daz Studio export shows 72,712 vertices while the Poser export shows 74,826 vertices. Daz Studio strips out loose vertices while Poser gives you everything. Tabbing into Edit Mode for the mesh, then running Select > Select All by Trait > Loose Geometry reveals that the extra geometry is actually the boundaries between geometry groups in Poser.
Deleting these extra vertices brings the count down to the total that Daz Studio exports. You can do this by selecting Mesh > Clean Up > Delete Loose.
Symmetry Issues
If you run into symmetry issues, tab into Edit mode for the figure’s mesh and then select Mesh > Snap To Symmetry.
💡
Sometimes, Snap to Symmetry doesn’t catch all of the vertices. I’m not sure if this is a limitation or bug in Blender, or if it’s the nature of working with the A3/H3 figures from Daz. When I encounter this issue, I keep running Snap to Symmetry until there’s no more vertices to be mirrored.
Bone Roll Issues
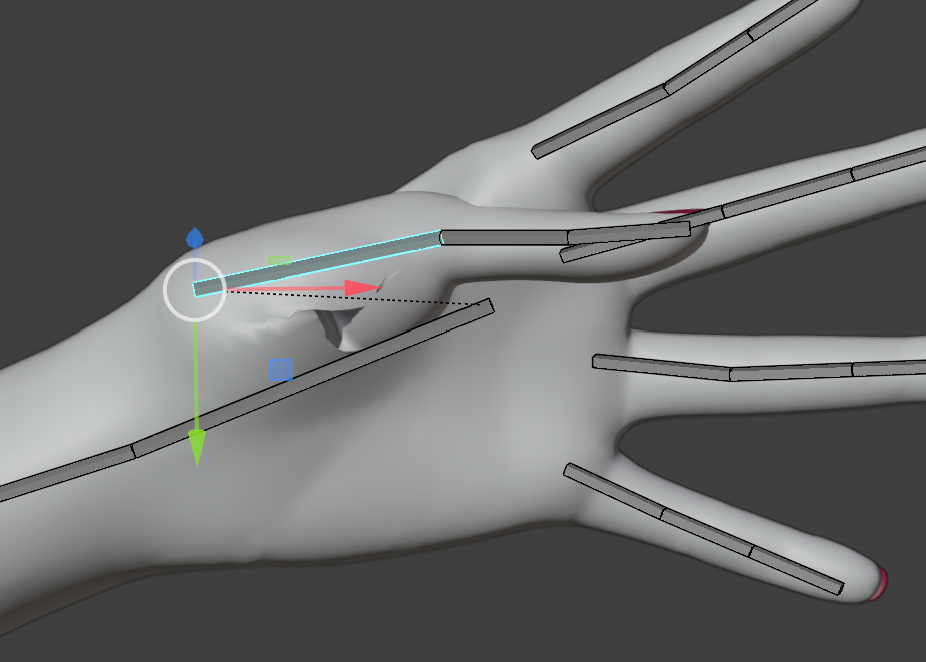
One area in particular to pay attention to are the fingers. What I noticed is that when rotating on the X axis, the fingers were moving side-to-side instead of curling like I’d expect in Blender. On the Z axis, the fingers would curl but also would bend off-center.
I figured out that this had to do with the bone-roll setting for each bone, which is easily fixed by going into Edit Mode, selecting all finger chains, then pressing Shift+N, which brings up the Recalculate Roll dialog. Select Global +Z Axis to recalculate the bone roll for each chain.
Now go back to Pose Mode and try bending the fingers again—they should bend as expected. The thumb bones turned out to be more challenging than the fingers. What I had to do here was manually adjust the bone roll until I got each thumb bone to bend in a way that worked for me.
💡
A quick way to resolve bone roll issues is to select the entire armature and press Shift+N. This should resolve any issues regarding unexpected bending directions.
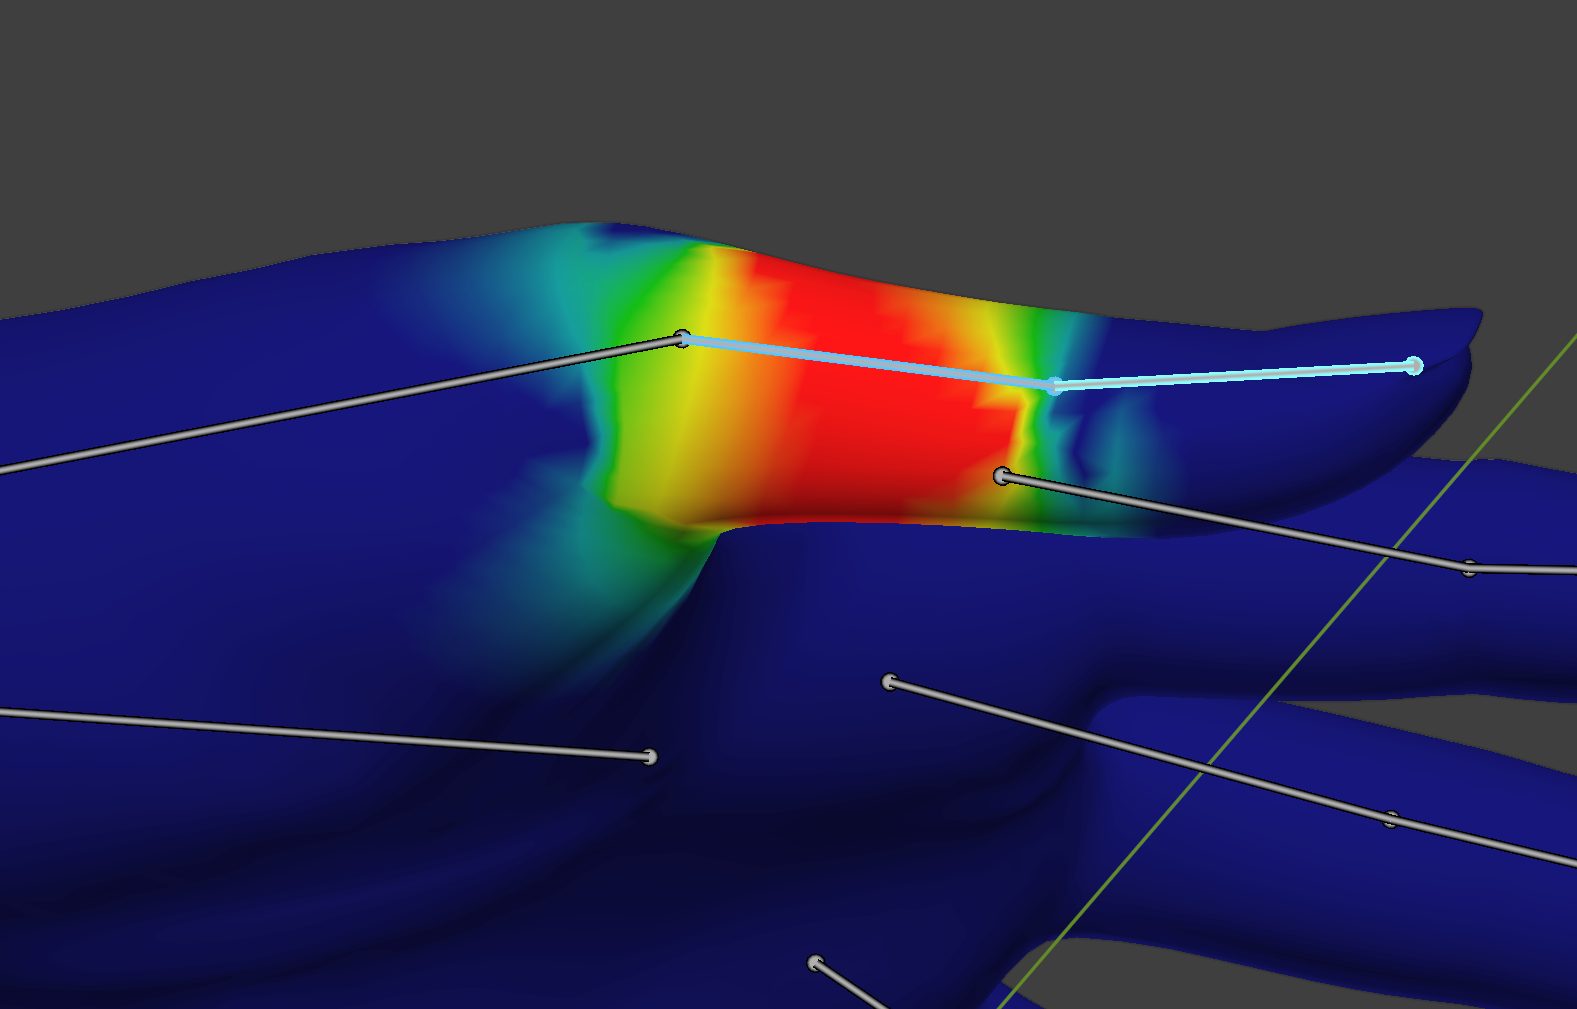
Correcting Weight Mapping Issues
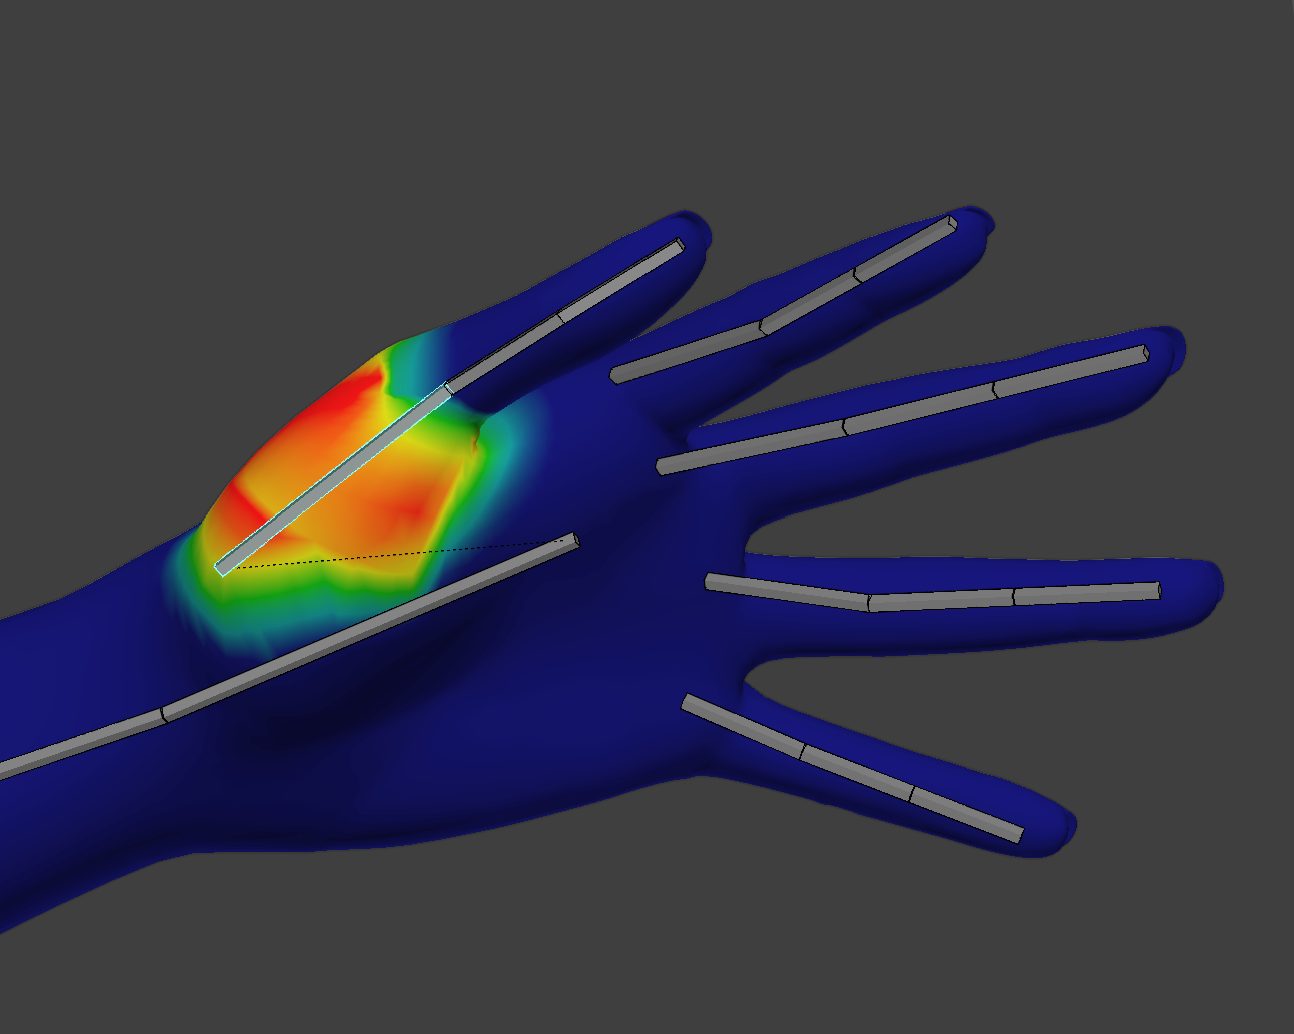
While testing out how the armature bends, you probably noticed the mesh bending in weird ways—once again this is particularly noticeable in the thumb- and finger chains. In many cases, about the only real adjustment you’ll need to make is smoothing out the weight-maps for each bone.
Other Bending Issues
Aiko3 (and the other Daz Millennium 3 figures) was notorious for having bad bending in the shoulders (the dreaded boulder-shoulder issue present in the male figures), and thigh/buttock bone areas—this issue will still show up in Blender, but thankfully, it’s easier to correct by adjusting the weight-maps on the shin, thigh, and buttocks weight-group.

Other Issues
This is specific to Aiko3 and Hiro3 when the Realistic or Stylized morphs are used. On import, the eyes are off-center. The reason this happens is that in Poser, these two morphs don’t just change the shape of the mesh, but also apply a world (or local?) transformation on the eye geometry—the eye centers change based on how much the morph is applied. Unfortunately, Poser’s exporter doesn’t take the transformation into account.
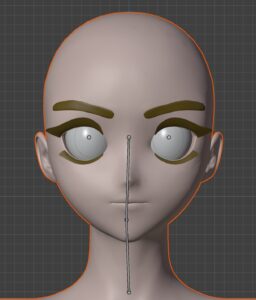
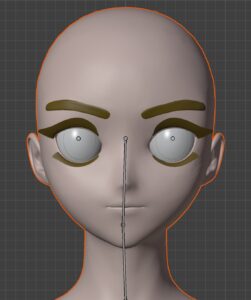

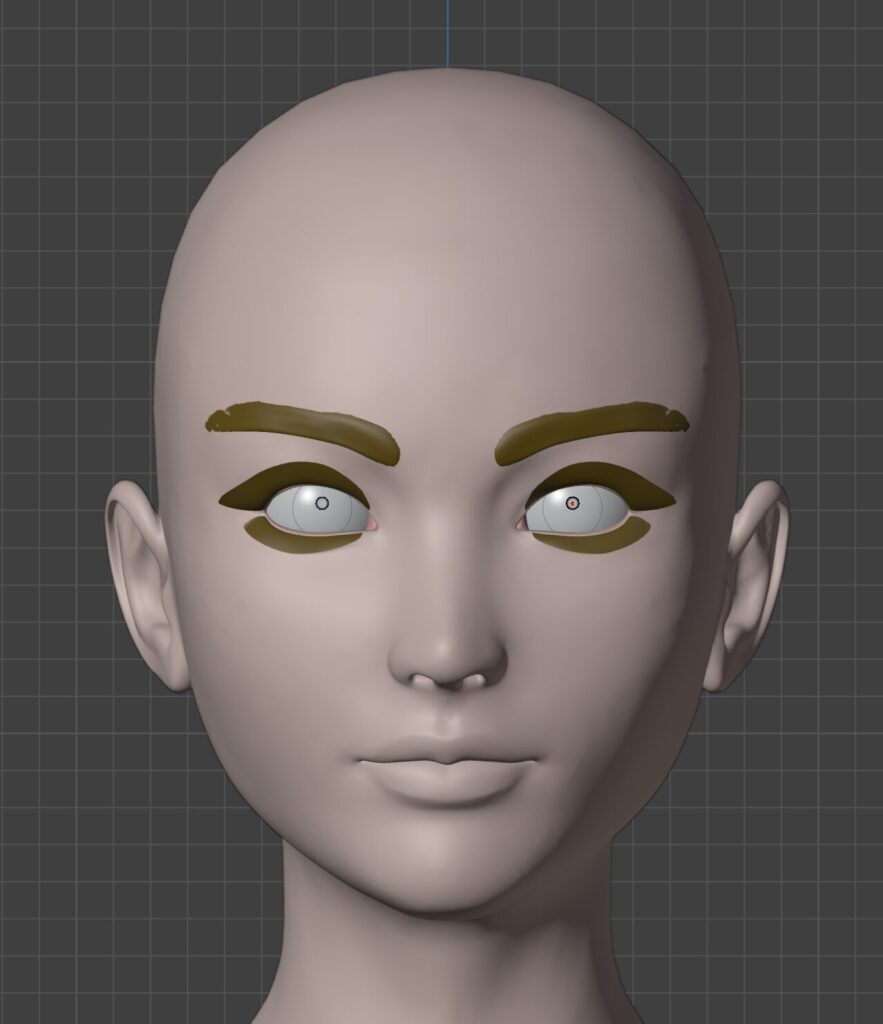
This isn’t apparent due to the default view of the armature—Octahedral is selected by default. Changing to B-Bone or Stick (Viewport Display tab in Armature Properties) will allow you to see this easier.

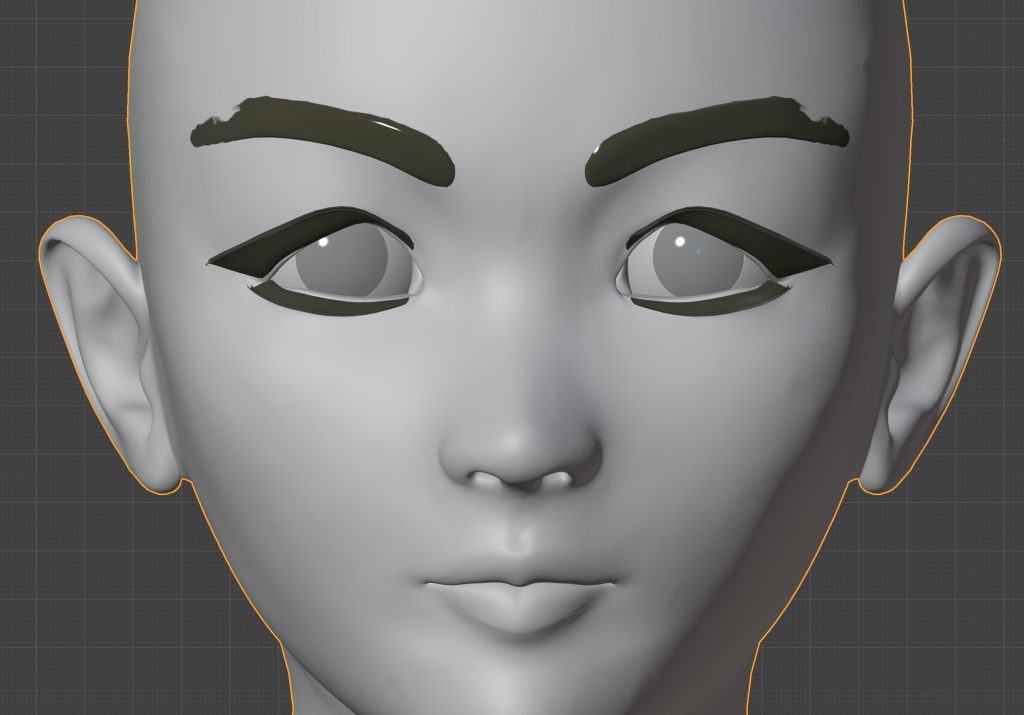
To fix the eye positioning issue, go into Pose Mode and make sure that Pose Symmetry is enabled (X button next to Pose Options drop-down). Then select the left (or right) eye bone and move it until the eye is positioned correctly. Next, making sure that the eyebone is still selected, press Shift+S to bring up the 3D cursor pie menu. Click on Move Cursor to Selection. We’ll use the 3D cursor position to recenter the eye geometry.
Hit Ctrl+Tab and select Object Mode. Hide the armature (in the Outliner tab), then select the figure. Hit Tab to move into Edit Mode for the mesh. Enable the X axis mesh symmetry option (next to Options dropdown). Now, select the Data Object properties tab in the Properties panel. Navigate to Vertex Group, then search for either Left_Eye or Right_Eye. Highlight either one, then click the Select button directly below the list. Back in the Edit window, press Spacebar to open the tools menu and select Move or press G+X. Now, move the highlighted mesh along the X axis until it’s aligned with the 3D cursor.
At this point, you should have a barebones armature and weight groups that actually work. Next, we’ll cover what to do with the extra bones imported for the clothing and hair.
Linking Clothing and Hair to the Main Armature
We’re going to look at adding hair and clothing if you imported the base figure, and what to do with the extra bones if you imported the figure plus clothing and hair.
Separating the Extra Root Bones
Start by hiding the geometry—this makes it easier to see what you’re doing (trust me). Next, hit the Tab key to go into Edit Mode. Now, hide the Body root bone—using Shift+Click to hide the entire tree. This one is our main armature and we don’t to lose it.
Delete the Extra Bones
This option is by far the easiest. Make sure that the other roots are visible (Body.001, .002, etc). Select one bone, then press the A key to select all. Then press D to delete them.
💡
Selecting that one bone makes sure that bones in the main armature are deselected when you go to select the extra bones. When you hide bones in Edit Mode in Blender, those bone stay selected so if you don’t clear that selection before selecting other bones, any edits you make to visible bones will affect the hidden ones as well. I’ve run into that issue a few times when building custom rigs for my characters.
If you decided to save the extra bones in a separate armature, then the Outliner in Blender should look similar to the screen capture below. In either case, the Armature in the screen-capture below is what you should be left with.
Imported Character with Hair and Clothing
If you imported your character with hair and clothing, you’ll want to keep the weight-groups from Poser.
Rename Weight Groups in Clothing and Hair
What you’re doing here is renaming the weight groups to match the bones in the main armature. This is both easy and tedious—easy, because the only thing you’ll be doing is removing the trailing number sequence from the weight-group name (.001, .002, etc), but also tedious depending on how many weight-groups each figure has.
Because Blender’s Batch Rename feature doesn’t work on Vertex Groups, I had to write a Python script that strips out the trailing digits—I should turn this into an add-on at some point.
Transferring the Main Figure’s Weight Maps to Hair and Clothing
If you didn’t import a character with hair and clothing, but have hair/clothing meshes of your own that you wish to use with the character, these next steps will guide you in the process of transferring weight maps from one object to another.
💡
A note on imported hair figures—if you use the same FBX import process as you did for the figure, don’t replace the weight-groups in the hair with your character’s weight-groups. Use the ones that were imported with the hair.
Using the Data Transfer Modifier
Select whichever mesh you wish to start with. In the example, I started with the hair. In the Properties panel, open the Object Data Properties tab and scroll down until you find Vertex Groups. In the drop-down (see screenshot below), select Delete All Groups. Repeat this process for every separate mesh minus the main figure.
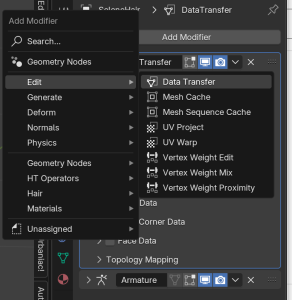
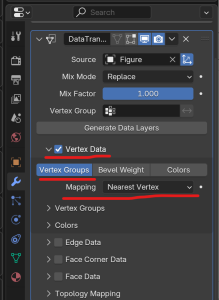
Going back to the first mesh you selected when removing the vertex groups, go to the Modifiers tab in the Properties panel, and search for, and select, the Data Transfer modifier. Then, using the eyedropper tool in the Source field of the modifier, select the main figure. Next, adjust the modifier settings according to the screenshot to the left. Once finished, click the Generate Data Layers button.
Once finished, apply the modifier. Now navigate back to your armature and enter Pose Mode. Once again, play around with bending to find any issues with mesh deformation.
Repeat this process for each figure until you’re finished.
What’s Next?
At this point, you should have a fully working deforming armature. Next steps are going to depend on your use-case—using the imported rig as the basis for a custom rig, or converting the imported rig to a meta rig like Rigify or CloudRig.
Bonus Thoughts
- Interestingly enough, Daz Studio also has a basic FBX Exporter↩
- Strongly dependent on the figure, of course.↩
- See Poser’s documentation on Weight Maps↩
- Most of the time, I tend to not bother with material data exported from Poser since I end up redoing shaders anyway↩
- If you need more information on what the options in Poser’s FBX dialog do, see Poser Reference Manual > FBX Export Settings and Steps↩
- Pro-tip: for additional visibility, go to the Armature’s Object tab and change view settings to Wireframe↩