
Why would you want to move assets from Poser to Blender? Maybe you want to replace your Poser workflow with Blender, or breathe new life into old figures like Aiko3. This tutorial will serve as a how-to for transferring content from Poser to Blender. The focus will primarily be on Aiko3 and Hiro3 since these two figures are part of my workflow, but this tutorial should work with some tweaking for other Poser figures.
This tutorial assumes that you’re relatively comfortable working in any of the three programs used. Versions used in this tutorial:
- Poser 11.3 (workflow shouldn’t be any different in 12 or 13)
- Daz Studio 4.22
- Blender 4.4.3
Tutorial Changelog (2025-07-13)
2025-07-13
Updated the tutorial with some additional findings and reasons behind some elements of this workflow.
2025-06-29
Turns out I didn’t actually use the Matt morph with Hiro3 like I originally thought. During preparations for the video version of this tutorial, I found the original Poser file for my child anime character and due to the difference in polygon counts between Millennium children and Hiro3, it would have been impossible to create a morph that way. I’ve edited the tutorial to reflect that.
Table of Contents
Step-by-Step: The Poser ➡️ Daz ➡️ Blender Workflow
Turn off IKs and Zero the Figure’s Pose
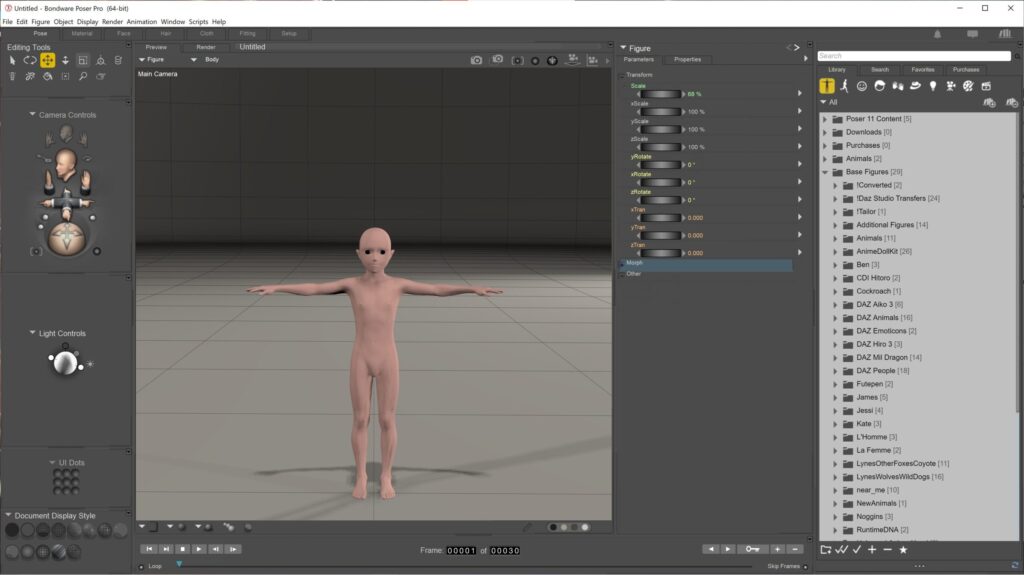
Let’s start by loading the figure in question with all morphs applied. Then you will need to turn off any IKs on the limbs, and then zero out the figure’s pose.
This is something that I can not stress enough. If you try to bring the figure into Daz Studio unzero’d with the IKs turned on, your figure will have weird deformations. The easiest way to check if IKs are turned on—and to disable them—is to press Shift+Ctrl+E, which opens the Hierarchy Editor. The IK Chains section is inside Figure, below the Body child element. If any of these boxes are filled, clear them. This will disable the figure’s IK chains.

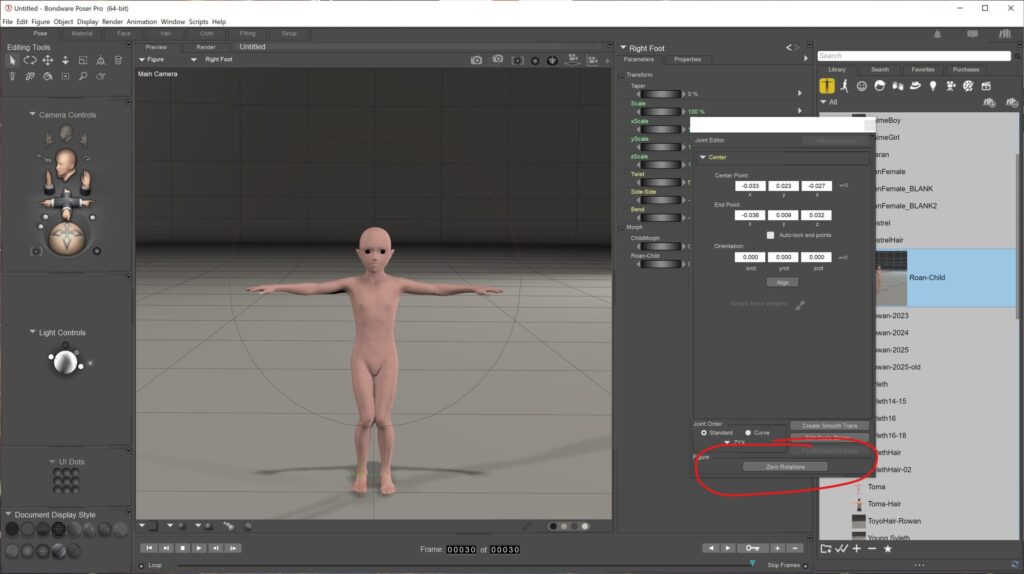
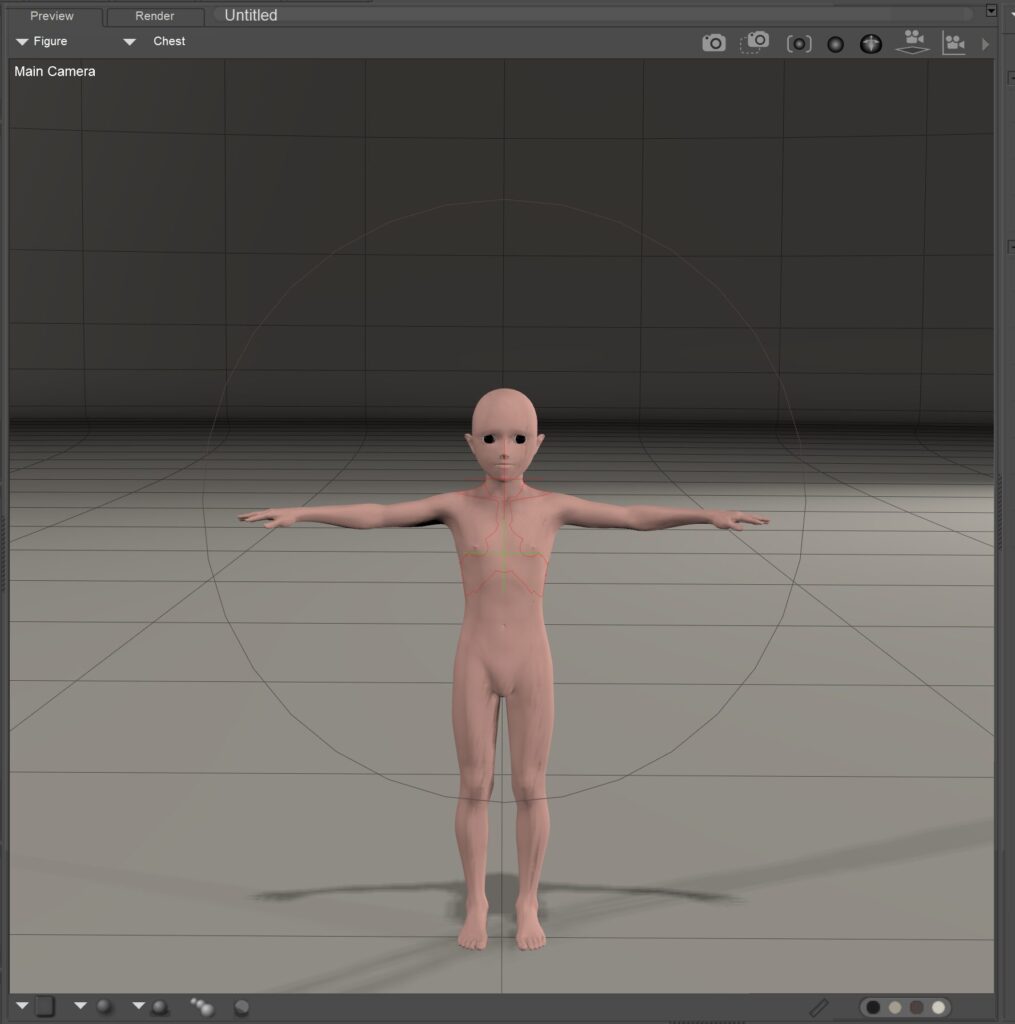
Now that IKs are turned off, you can zero the figure’s pose without any issues. Select the figure (click on any body-part), then press Shift+Ctrl+J to open the Joint Editor. At the bottom of the Joint Editor window, press the Zero Rotations button. Your figure should look similar to the figure in the second screenshot below.
Exporting the FBM (Full Body Morph)
💡
The reason we create a full-body morph here is to make it easier to export from Daz Studio. The more morphs you add to an export in Daz Studio, the longer the compiling process takes, and it can even cause Daz Studio to crash.
Now we’re ready to export the morph as a full-body-morph. I’ll use the abbreviation FBM throughout the rest of the tutorial. If there are any height transformations on the body, arms, or legs, remove them because not only will they cause problems when you port the figure from Daz Studio to Blender, you will run into deformation issues with the limbs when you create the FBM on the blank figure[1]. You can re-apply these later on in Blender.
Select the figure, and go to File > Export > Wavefront Object… On the first dialog that appears, make sure Single Frame is selected and then click OK. This will bring you to the Select Objects dialog. Make sure that only Figure is selected, and nothing else. No lights, cameras, or props should be selected. Look for hidden props parented to the Figure itself, and make sure those are clear as well.
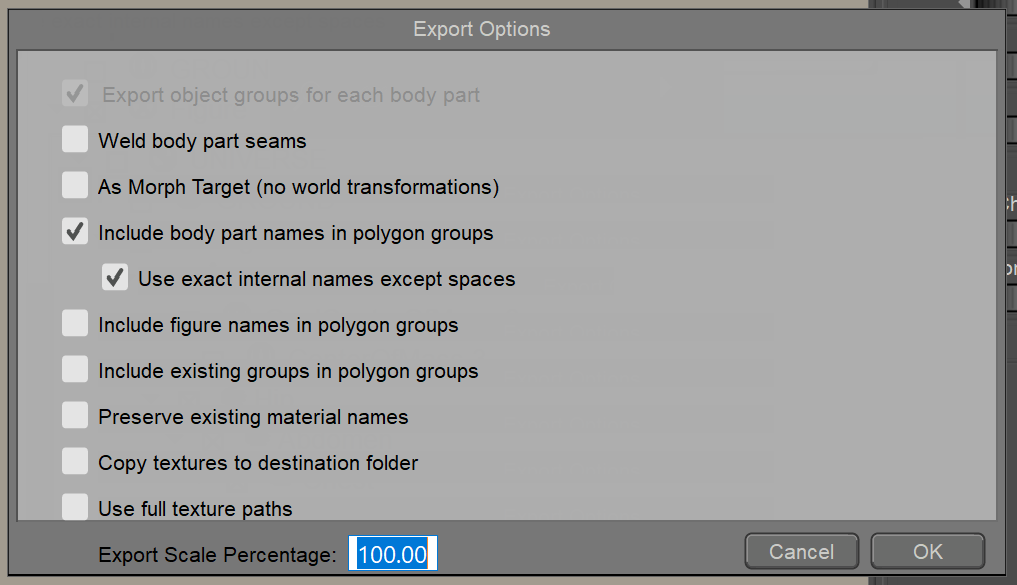
Click OK again—now the Export Options dialog should appear. I usually uncheck As Morph Target because this has caused problems for me in the past, and can actually interfere with the morph in some instances.
💡
These are the settings I used to create my full-body morph in Poser. Note that “As Morph Target” isn’t selected. In some instances, like with Aiko/Hiro 3 using the Realistic or Stylized morphs, exporting with some world transformations is necessary because those morphs actually move the centers of the eye geometry. If you’re using Aiko/Hiro3 or any figure with morphs that change geometry centers or origin points, then you’ll need to leave that option unchecked. Another issue I’ve run into with leaving “As Morph Target” checked is that when I apply the morph to the new figure, I get a “wrong number of vertices” warning.
Now, load a blank version of the figure in question—no morphs applied.
Apply your saved OBJ file as an FBM by going to Figure > Load Full Body Morph. Make sure that the Attempt Vertex Order Correction is unchecked—this is another area that’s caused problems for me in the past.
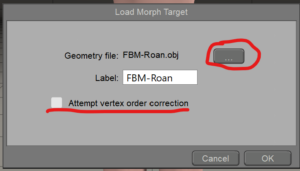
Load your FBM by clicking the button next to the Geometry file field, and navigate to where you’ve saved your OBJ file. Select the file, then click OK. In the Parameters panel, you should see a new morph option that has the name you selected. Check the morph to make sure it works by adjusting the dial.
Since we loaded a new figure, double-check the figure’s IK settings and once again, reset the figure’s pose.
⛔
This process can be a bit of a headache because sometimes, the file either doesn’t apply or makes the figure go “asplody” when you test the morph. If this happens, repeat the steps above but double-check everything.

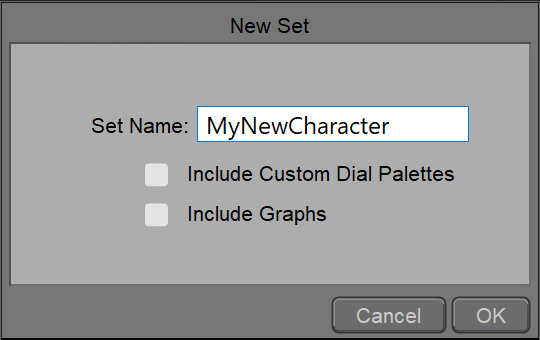
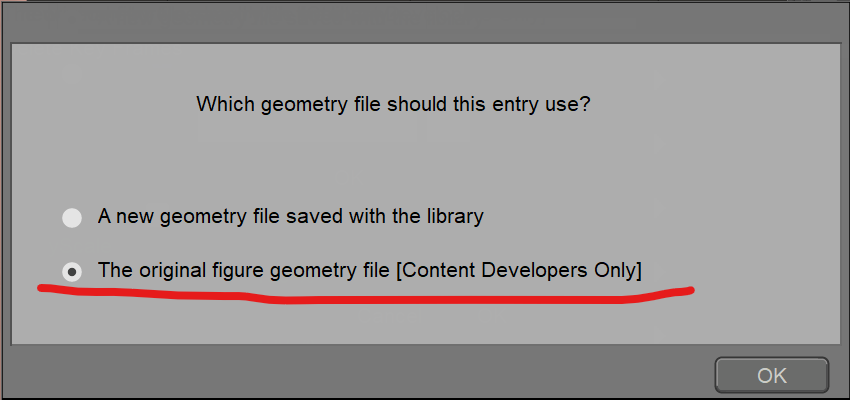
If you’re satisfied that the morph works as expected, reset it to 0. Now, save the figure in Poser’s library as a new CR2 file. You can do this by clicking on the + button below the Library panel. The first dialog that appears will prompt you to name the figure. Leave the two check-boxes cleared, but enter the name, then click OK. The next dialog that appear will prompt you to specify which geometry file to use. The first option is selected by default—this is not the option you want because it will lead to issues when importing into Daz Studio. You want the second option. Select that option, then click OK. Your new figure should appear in the Poser library.
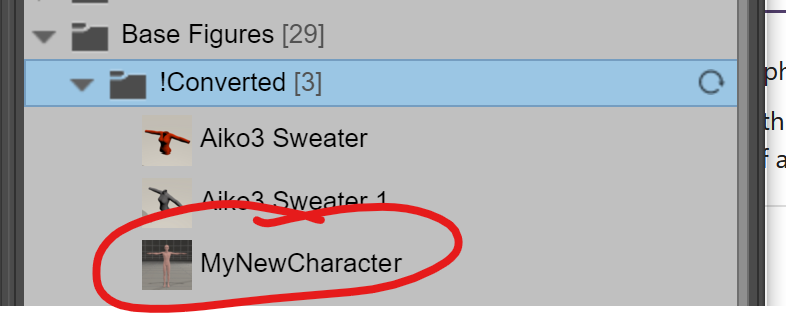
To make things a bit easier for the next step, right-click on the new entry and select Show in Explorer (Mac users will probably have something that says Show in Finder). Make a note of the path where the file has been saved.
Now we’re done with Poser, so go ahead and close the program. If you like, you can save the Poser file for future reference.
Now, on to Daz Studio. You will need the free Daz to Blender Bridge add-on, which is available on daz3d.com.
In Daz Studio
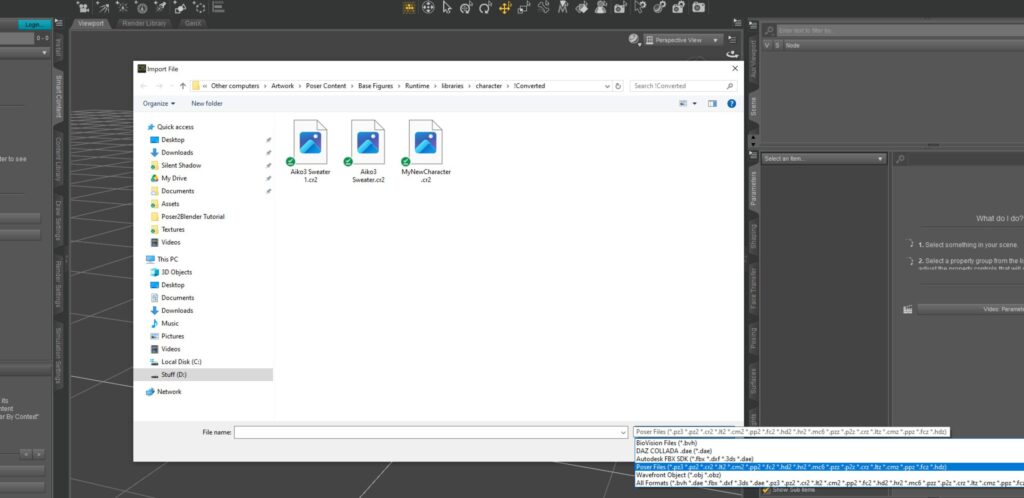
Now, open Daz Studio and go to File > Import and select Poser files. Navigate to the location where you saved the CR2 file. Double-click the file to load it in Daz Studio.
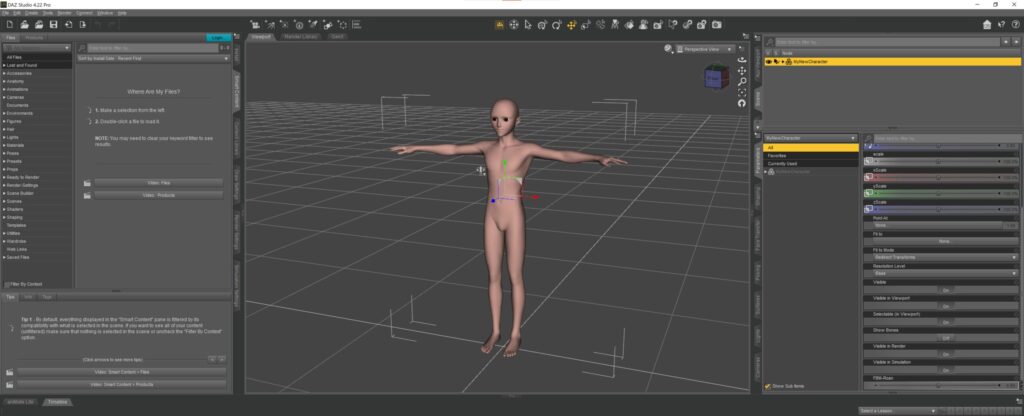
Now that the figure is imported, double-check morphs and appearance. Go to Edit > Figure > Rigging and select Convert Figure to Weight Mapping. Make sure that TriAx is selected. This part is important because none of the morphs will transfer to Blender if it isn’t done.
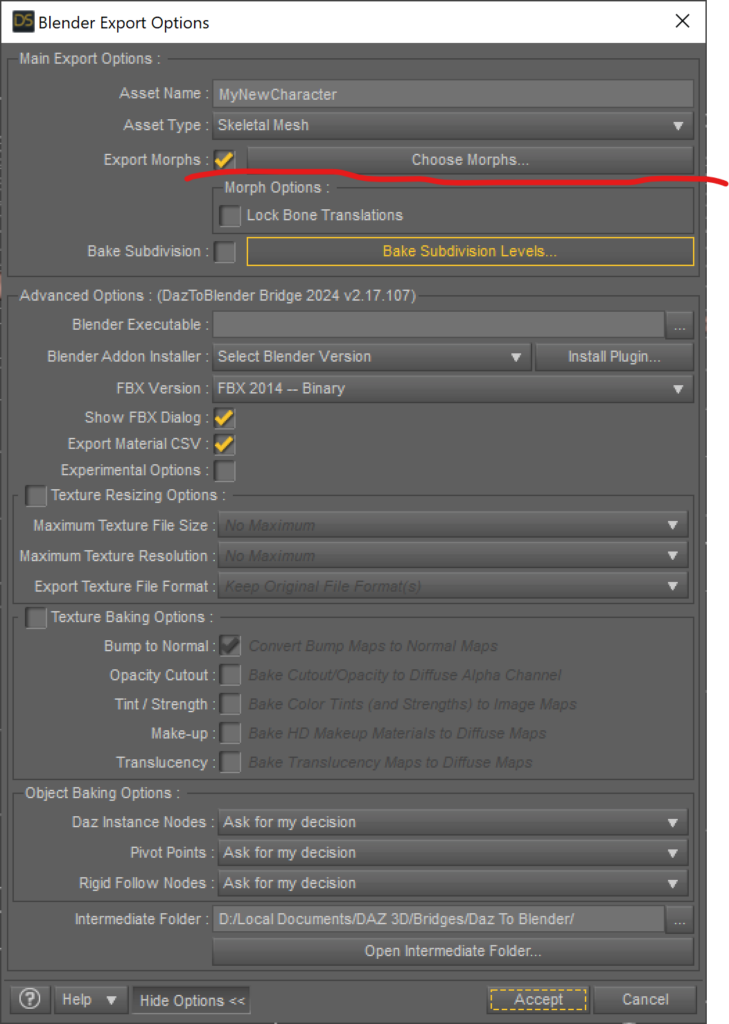
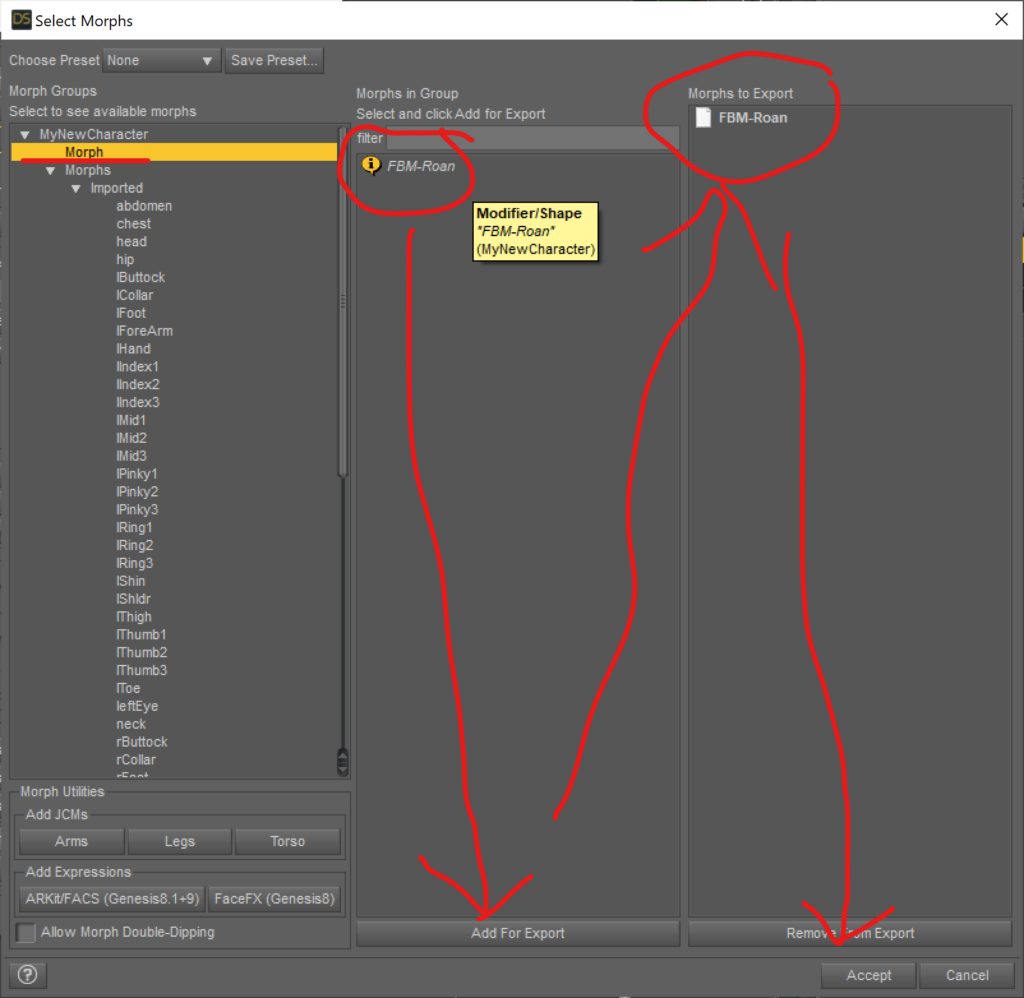
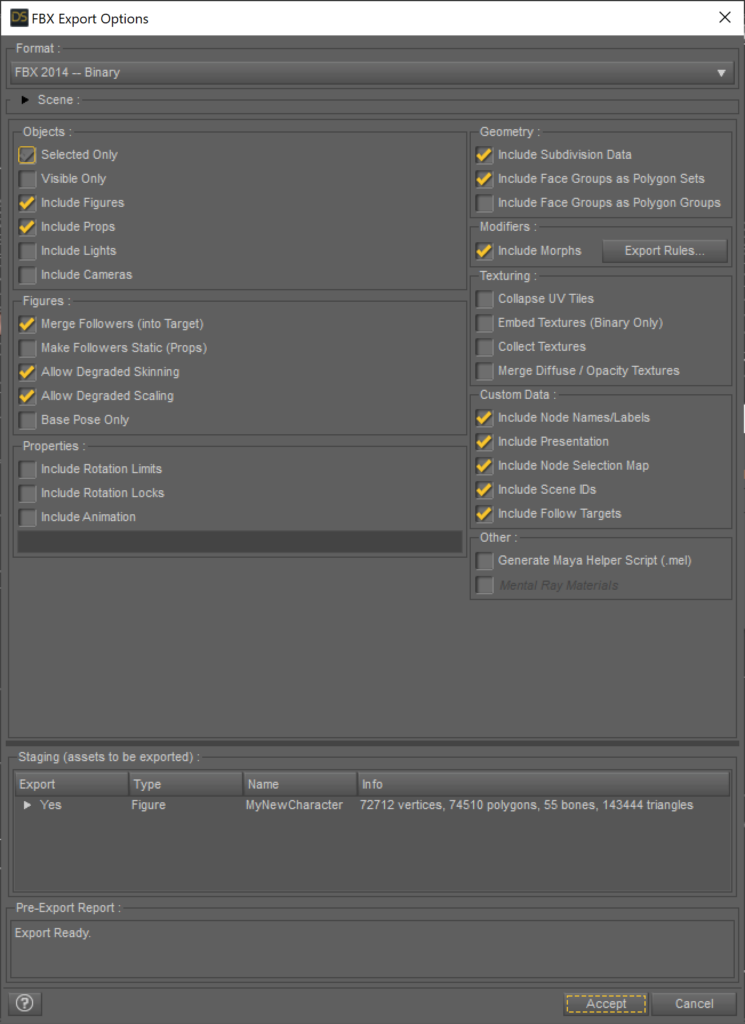
Once again, double-check figure to make sure everything is working. Now go to File > Send To > Send To Blender. Select the FBM you created in Poser, plus any other morphs you want to transfer over. Other than that, don’t change any other settings. Click Accept on the Select Morphs dialog, then click Accept again on the Blender Export Options Dialog. Now, you should get a third dialog called FBX Export Options. Don’t touch any settings here, either unless you know what you’re doing, then click Accept. If all goes well, you should get a window telling you that the export was successful and to open Blender to complete the process.
If you wish, save this Daz Studio file for later work. Now, to Blender.
💡
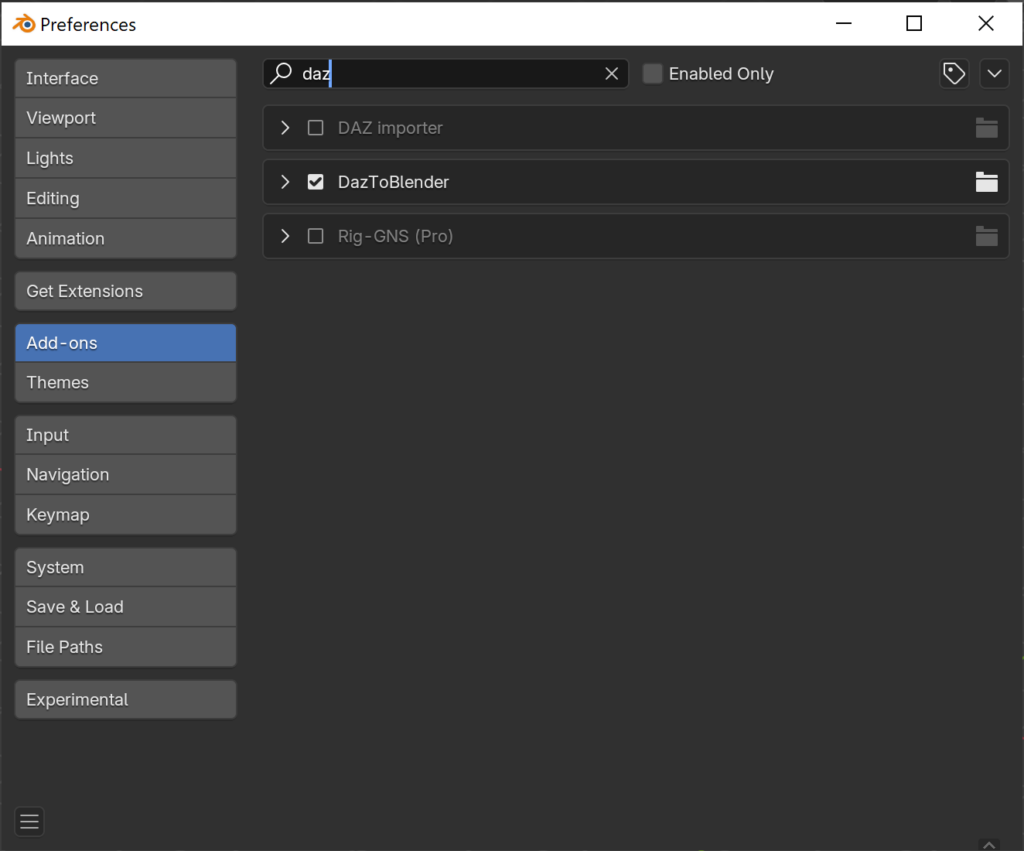
You will need the Daz to Blender Bridge add-on for the next portion. Note that this add-on isn’t available on extensions.blender.org—you will need to download it from Daz3D.com, and install it through the add-on inside Daz Studio. If you made it through the Daz Studio step, it should already be installed—you will need to double-check in Blender that the add-on is active.
In Blender

If you haven’t done so already, open Blender. In the 3D view, hit N to open the menu on the right side, then click on the Daz to Blender tab. Click on Import New Genesis Figure to bring the figure over.
💡
The wording on the button doesn’t matter. The import process will work with most figures as long as they’ve been converted to TriAx weight mapping in Daz Studio.
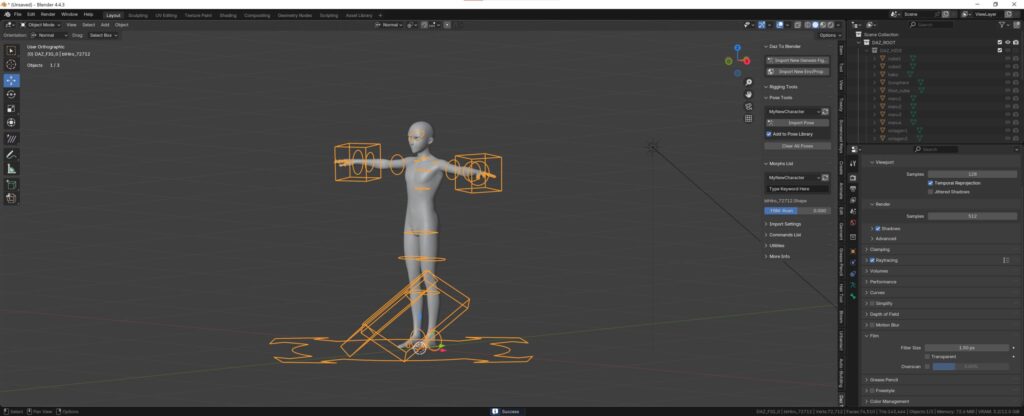
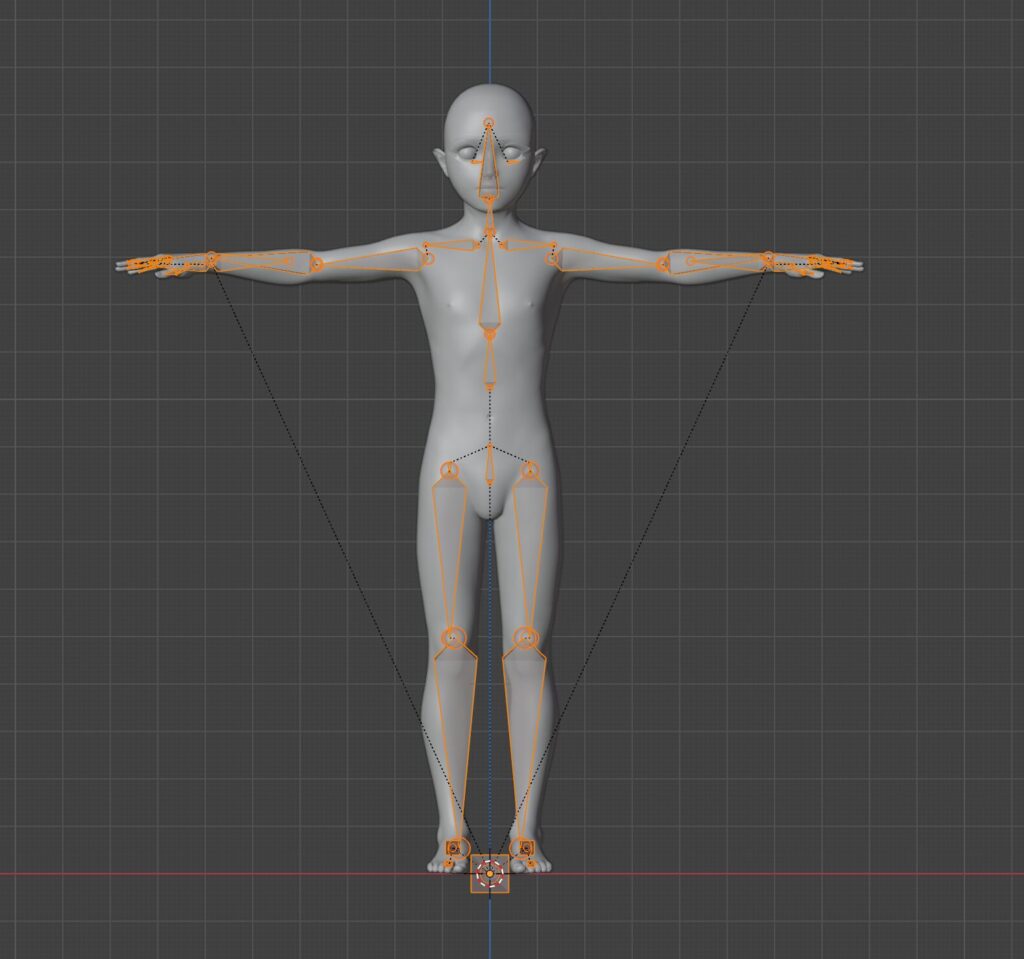
If everything is successful, figure should be pose-able with very few deformation issues.
💡
One of the issues I’ve run into with this process is that the fingers don’t bend correctly. After a ton of debugging, I found that having the figure’s height set higher or lower than its default will cause this issue. This is why I stress removing any height transformations prior to starting the import process. There’s an example further down on how to deal with situations where height transformation can’t be avoided.
Now that the figure has been imported into Blender, double-check and make sure that the morph still works as expected. In the Daz to Blender panel, under Morphs List, is where you’ll find any morphs that you imported. If you set the morph to 1, you will see weird deformation issues right away. If this happens, change the value to 0.5 and now your morph should appear normal[2]
Poser- and Daz Studio’s bone/vertex group naming conventions aren’t compatible with how Blender handles symmetry. They will need to be renamed and since there’s no way (that I know of) to do conditional logic in Blender’s batch renaming function, I wrote a Python script to handle this extremely tedious portion of the workflow. That script is available [here] for download.
Now you can adjust the figure’s height by first selecting the armature, then the figure, and then scaling until you have the height you want. Make sure to apply transformations to both figure and armature before proceeding.
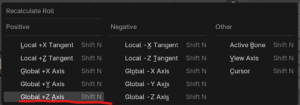
Last step before you start any modifications to the rig—tab into edit mode for the armature, select all bones and then press Shift+N. Then select Global +Z Axis to reset the bone roll. This resets the bone rolls from the Poser/Daz defaults, which can behave a bit wonky when posing. One thing to note is that the Daz import does add Limit Rotation constraints, so resetting the bone roll will break the constraints.
One last thing to note: the import process does add IK constraints to the hands and feet but they don’t work so you will need to redo them as well. In particular, the Daz import adds a reference to a pole target on the leg IKs but doesn’t import that bone. There are ways to fix this, but this post has grown long enough as it is. In the meantime look around on YouTube for tutorials on setting up IKs in Blender[3].
Inside Blender: Fixing Issues Caused by Height Transformation
So you imported a figure that didn’t have a height transformation but its morph did. Luckily, the figure I used for this tutorial is an example of the height transformation issue. Or rather, it’s an example of a figure that did have its height set to the default 100% in Poser, but the height still changed due to the morph used[4].

In this example, there was a bit more going on than just the height-change. Because what I was trying to do was create a child morph based on Hiro3, which required some adjustments because drawing or sculpting children isn’t just shrinking down adult proportions.
So yes, there will be times where the height issue[5] can’t be avoided. If you encounter this issue, you will need to manually adjust the position of the bones.

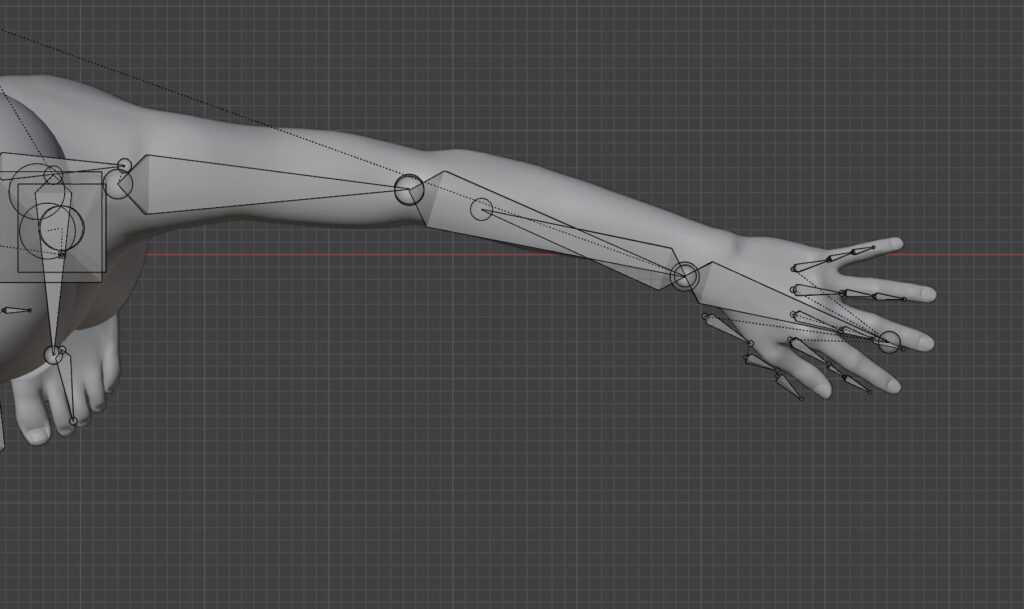
What I ended up doing in this example was tabbing into edit mode for the armature, selecting all bones while making sure that Transformation Orientation was set to Global and Transform Pivot Point was set to 3D Cursor—if your 3D cursor isn’t at its default location, press Shift+C to reset it. Once you have the bones selected, press S and begin scaling the bones until they line up. It still won’t be perfect—in my example, the eye-bones still didn’t line up properly, and when viewing the figure from above, the forearm-to-hand joint, and the finger bones were still off-center.
Tips and Final Thoughts
Whew—that’s a lot of content to cover in one post. If you lasted this long, congrats—you are a very very patient person! I am working on a video that details the process from Poser to Daz to Blender that hopefully provides a better idea of the workflow, some of its pitfalls, and how to fix any issues that might come up.
I mentioned above that the Daz import adds constraints to the bones, and that they either come in broken (IK constraints) or will break when resetting the bone roll (Limit Rotation constraints). In that case, it’s easier to clear out all constraints and start over from scratch.
In the case of Limit Rotation, that isn’t a bad idea at all because this constraint is being used to account for the bending issues that Aiko3 and Hiro3 had[6]—both figures were released[7] before weight-mapping became common-place[8].
I’ve found that most of these bending issues are easily corrected by either adjusting the weight-maps that come over from Daz Studio and/or creating corrective shape-keys for those situations where weight-map adjustments only partially work.
Next up in my tutorials list: Bypassing Daz Studio completely: Using FBX to Import Poser Figures Directly into Blender, so stay tuned for that tutorial plus video content for this tutorial and others!
Bonus Thoughts
- I found this out while recreating my Hiro3/Child character featured in this tutorial.↩
- I think this might be a bug in the Daz importer—this field is actually linked to a driver on the shape-key in question. Reviewing the driver on the shape-key reveals that the value from this field is getting added twice.↩
- Disclaimer: Not my video, but here’s a YouTube Short on How to Setup IK Bones in Blender↩
- Interestingly enough, the displacement of the finger bones didn’t happen during the recreation of my character for the video tutorial.↩
- “Height” issue is probably a misnomer in this case since the issue was likely due to changes in proportions between the head and arms↩
- That horrid bending issue in the thigh that Aiko3 had was easily corrected by adjusting weight-maps for the thigh, buttocks, and hips. ↩
- According to this thread on the Daz3D forums, Aiko3 was released in November 2004, while Hiro3 was released in April 2005. ↩
- Weight-mapping wasn’t introduced to Poser until 2011 with the release of Poser 9. Probably one of the few good things that SM did when they had control of Poser. ↩